Thursday 31 December 2015

Valentine Card Created for the Chocolate Baroque Colour Challenge 18


I thought that this month’s colours gave a perfect opportunity to get ahead with a Valentine’s Day project. I hope that you like it.

I am looking forward to seeing your projects for the Challenge, Anne x.

Materials:
  • Baroque Orchids stamp
  • A5 scalloped red card blank, white stamping card, white pearlescent card
  • Red coloured pencil
  • Red and black ink spritzers
  • Versafine inkpad – Black Onyx
  • Fine black marker, red and black alcohol markers, white acrylic pen
  • Glossy Accents
  • Adhesive and 3D glue gel
  • Border punch, heart and sentiment dies – Tonic

How to make it:
  1. Spritz white card with red and black inks. Dry, trim and edge with black marker. Add highlights with white pen. Layer onto white pearl card and glue to the card front.
  2. Cut border from pearl card using a punch and glue to the card front. Also glue on a strip of the waste card (after punching).
  3. Cut 3 hearts from white stamping card. Draw faux stitching with fine maker and edge with black alcohol pen. Cut the sentiment from pearl card and colour with red alcohol marker. Stick to 1 of the hearts.
  4. Stamp the remaining 2 hearts with black ink. Tip: to help align a specific area of the stamp onto the heart it is easiest to lay the stamp flat onto your craft mat, then lay the die cut heart down onto the stamp. Rub over to transfer the image.
  5. Colour the image with red pencil leaving the border uncoloured.
  6. Glue the hearts to the card front using 3D glue gel. Finally add a layer of Glossy Accents to the stamped hearts, omitting the border.

Sunday 27 December 2015

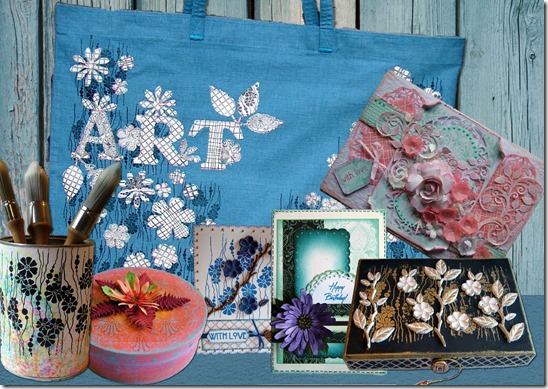
Art Bag Created for Chocolate Baroque TV Show

I created this sample for the recent TV shows from Chocolate Baroque on The Craft Channel. Lesley Wharton was fantastic and gave some wonderful demos using the new background stamps – Floral Weave, Open Weave, Studded Lattice and Baroque Orchids. They are so versatile for so many projects and styles.  

 I have used recycled curtains to create myself a large Art Carry bag. I used all four of the lovely new background stamps to decorate my fabrics. Now I have a lovely new bag to carry my unframed paintings to exhibition. You could easily adapt the design idea to make a shopping or handbag, or to decorate a ready-made bag.  Materials:
How it was made:
  1. I first made a simple strong bag to fit my board mounted artwork pieces. Simply 2 rectangles sewn together with handles to fit over my shoulder. This is a very large bag so it is easy to decorate and sew on the applique pieces while made up. For smaller bags and shoppers it would be easier to decorate the panels before completing the construction.
  2. Ironed Bondaweb onto the back of the cream lining. Leaving the paper backing in place cut out flowers and leaves with the dies. Printed the text to create a template for cutting the lettering.
  3. Stamped all the cut shapes with textile paint using a random mix of all four stamps (see tip). Left overnight to dry and cure.
  4. Stamped the front of the bag with the Floral Weave stamp. Left overnight to dry then fixed the paints with an iron (this makes the paint permanent and washable).
  5. Peeled the backing paper off all the cut out shapes and ironed onto the bag. This secures the shapes and heat fixes paints.
  6. Finally I stitched around all the shapes using a straight stitch and free machine embroidery. This is where you drop the fabric feed dogs and freely move the fabric beneath the needle (like drawing with a sewing machine and thread).

Tip for stamping with paints: I used to use a standard sponge for applying acrylics or textile paint to my stamp. I would apply paint to a palette then pick up with a sponge, dabbing to remove excess paint before applying to my stamp. After a short while the paint would start to dry on the palette. The detail of the stamping was also gradually lost as clumps of paint built up in the stamp crevices after repeat application of paint. When this occurs you need to stop and clean up the stamp before continuing. I now use Cut-N-Dry foam and the results are so much better. I apply plenty of paint directly to the pad and work it well into the foam with a palette knife. The foam can now be used to apply paint to the stamp repeatedly without reloading. Placing the foam paint side down on a craft mat while not using also keeps the paint moist for ages. I find this method gives much sharper printing, uses a lot less paint and is easier to clean up when finished.  Clean up well and do not leave paint to dry onto your stamp. I use a little soapy water and a soft tooth brush if needed.

Tuesday 22 December 2015

Soutache Night Owl Created for Beads Direct

Yay! My Night Owl design has been published on the Beads Direct blog. I hope that you like him.

I have written a full tutorial for you: http://www.beadsdirect.co.uk/…/soutache-night-owl-by-anne-…/

Oriental Style Blue and White Card Created for Chocolate Baroque TV Show

I created this sample for the recent TV shows from Chocolate Baroque on The Craft Channel. Lesley Wharton was fantastic and gave some wonderful demos using the new background stamps. They are so versatile for so many projects and styles.  
 I used the lovely Floral Weave and Studded Lattice stamps to create this Oriental style card. Materials:
  • Mackintosh Sentiments, Floral Weave and Studded Lattice stamps
  • 5 X 7 in scalloped card blank
  • Dye based inkpad (Royal blue)
  • Archival Inkpad (Coffee)
  • Heart, Blossoms and twigs created with paper clay and mould
  • Gold PVA pearls, clear glitter glue and gold gilding wax
  • Fine tipped blue pen
  • 3mm blue ribbon
  • PVA glue, 3D glue gel and strong red liner double sided tape

How it was made:
  1. Stamped the card front Floral Weave stamp. Added glitter glue to flower centres.
  2. Stamped sentiment onto a die cut tag (blue). Stamped mat with Studded Lattice (coffee). Blended edges with blue ink.
  3. Attached ribbon with red liner tape. Glued all elements onto the card front.
  4. Highlighted 3D embellishments with gilding wax.
  5. Added faux stitching around the card borders with blue pen to frame.
  6. Added PVA pearls.

Monday 21 December 2015

Pretty Box Created for Chocolate Baroque TV Show

I created this sample for the recent TV shows from Chocolate Baroque on The Craft Channel. Lesley Wharton was fantastic and gave some wonderful demos using the new background stamps. They are so versatile for so many projects and styles.  

 I used the lovely Baroque Orchids stamp to give a plain balsawood box a complete make over. The box was actually an empty Turkish Delight sweet box left over from last Christmas. Materials:
  • Baroque Orchids stamp
  • White gesso
  • Acrylic flow formula paints – yellow, orange, bright pink and light turquoise
  • Turquoise alcohol pen
  • Die cut flower coloured with alcohol markers
  • Fern leaves created with paper clay and a mould
  • Pale blue glitter glue
  • Cut-N-Dry foam and paint brushes
  • 3D glue gel

How it was made:
  1. Painted the box with white gesso.
  2. Painted with yellow, orange and pink paints – blending the colours together.
  3. Stamped the box with the Baroque Orchids stamp in turquoise acrylic paint. Applied to the stamp with cut-N-Dry foam. Tip: to stamp the sides it is easier to place the stamp onto your craft mat and roll the box sides onto the stamp. Remember to clean your stamp quickly before the paint dries.
  4. Added dots of colour with alcohol marker and glitter glue. Sponged some turquoise acrylic along the box edges.
  5. Glued on the embellishments.

Winter Scene Christmas Card

Simple Christmas card created with Trees Galore stamp set (Crafty Individuals) and sentiment from Winter Trees set (Creative Expressions)

Another Quick Christmas Make using Stamps from Chocolate Baroque

Stamped the tree from the Sparkling Trees set, sentiment banner from Christmas Candlelight set, both from Chocolate Baroque. Background stamped and embossed (unknown Brand stamp from my stash).


Another Quick Christmas Make using Stamps from Chocolate Baroque

This one is a simple Christmas card – great for last minute or bulk makes.


Used an embossing folder from Sissix (Holiday Joy set) on a red card blank and sanded back to reveal the white core and enhance the texture design. Stamped and cut out the reindeer from the Sparkling Trees set, Lantern from Christmas Candlelight set, both from Chocolate Baroque. Sentiment stamped and embossed (Creative Expressions Winter Trees set). A touch of glitter glue and a peel off sticker to finish.

Playing with my Brother ScanNCut and Heartfelt Creations Papers

I love my Brother ScaNCut and the new freebie colour scanning upgrade is simply brilliant.

 
I created the shaped card blank, cut lettering, used pens to draw faux stitching and the sentiment. Also cut out decoupage elements from Heartfelt Creations Butterfly Medley papers.
Special card for Hope who will be 1 on New Years Day.
I created these personalised cards using the lovely Sparkling Trees set from Chocolate Baroque and Trees Galore from Crafty Individuals. The sentiments were printed from my computer and foiled (Mink toner sublimation foil).


Quick Christmas Card using an embossing folder and Reindeer Stamp from Chocolate Baroque


This one is a simple Christmas card – great for last minute or bulk makes.
 

Used an embossing folder from Sissix (Holiday Joy set)on a red card blank and sanded back to reveal the white core and enhance the texture design. Stamped and cut out the reindeer from the Sparkling Trees set from Chocolate Baroque. A touch of glitter glue to finish.

Sunday 20 December 2015

Christmas Gift Wrap using Sparkling Trees from Chocolate Baroque

Good morning. I have been finishing some last minute Christmas preparations. This simple brown paper gift wrap has added luxury with a stamped tag and bright satin ribbon. Great for wrapping a gift of Lottery scratch cards.
I just love the Sparkling Trees stamp set – it is so versatile. Of course I had to add one of those lovely stamped reindeer. Materials:
  • Sparkling Trees stamp set
  • White and red stamping card, brown wrapping paper
  • PVA glue, 3D gel glue
  • Inkpads: Versamark and Versafine – Black Onyx
  • Polychromos pencil
  • Embossing powders – Glitter in white base
  • Clear glitter glue, Glossy Accents (Ranger)
  • Satin ribbon and small die cut snowflake
Stamped the reindeer, added shading with pencil and cut out. Stamped the tree, embossed with sparkle powder and cut out. Coloured baubles with pencil and added Glossy Accents. A simple wrapped parcel looks luxury with the stamped trimmings.

Monday 14 December 2015

Recycled Brush Tin using the Floral Weave stamp from Chocolate Baroque

I created this sample for the recent TV shows from Chocolate Baroque on The Craft Channel. Lesley Wharton was fantastic and gave some wonderful demos. Simply a natural on the TV. 
   I used waste coloured paper which had been used underneath an alcohol ink colouring project. I kept it in my stash as I loved the random dots of colour. I used the Floral Weave stamp and black acrylic paint. The bold silhouette style is perfect for stamping over patterned papers. I then added a little blue glitter glue to the flower centres. Now I have a pretty tin for storing my brushes on my work desk.
Happy stamping, Anne x.

Wednesday 9 December 2015

My Project using the Free Tapestry Script Digital Paper from Chocolate Baroque

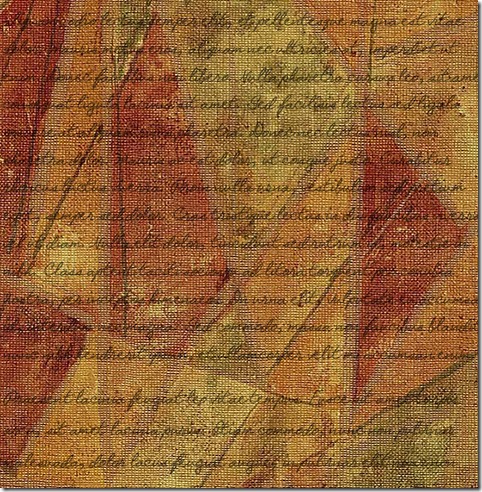
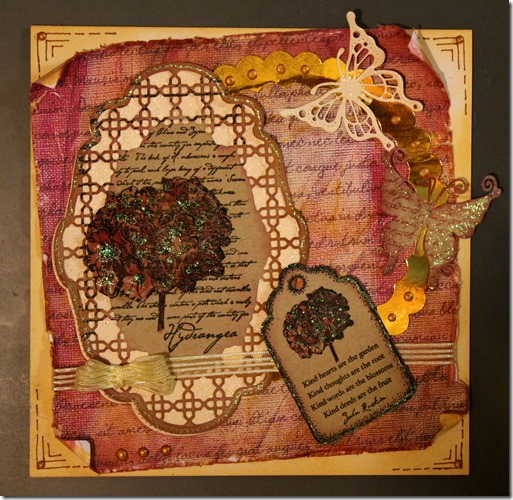
Hi all – what a lovely script paper we have been given this month. I have used mine with the Hydrangea Tag stamp set to create a vintage styled card. You can download yours from the Challenge Blog.

Tapestry Script


AW Digital Challenge 17 Hydrangea

I hope that you like it.

Happy crafting, Anne x.

Materials:

  • Tapestry Script free digital paper
  • Hydrangea Tag stamp set
  • White card blank (8 inch square), Kraft card, cream glitter card, gold mirror card
  • Inkpads: Distress Ink (Scattered Straw), Dye ink (deep pink/red) and Versafine (Onyx Black)
  • Fine marker (brown)
  • Glitter glue (clear) and PVA pearls (gold)
  • Dies for decorative trellis and butterflies (Tonic)
  • Organza ribbon (cream)
  • Adhesive, strong double sided tape, glue dot and 3D glue gel

How to make it:

  1. Print the paper and trim to approx. 7.5 inch square. Scrunch, distress and curl the edges. Add colour with the red and yellow inks.
  2. Ink the card blank edges with Distress Ink. Draw linear corners with fine brown pen.
  3. Stamp the main Hydrangea image twice, and the little tag once, with Versafine onto Kraft card. Also stamp an area of the text with red ink. Cut out the main image with the decorative trellis die. Cut out the tag and the flower from the second main image. Cut out the butterfly from the red script.
  4. Apply red ink to your craft mat and using a water brush colour the flowers. When dry cut into the extra flower with a knife, shape and lift some of the petals. Decoupage onto the main image using 3D glue gel.
  5. Cut out the backing mat for the trellis and a filigree butterfly from the glitter card. Cut a scalloped circular frame from the mirror card.
  6. Glue the gold frame to the printed paper. Use 3D glue to stick the trellis to the backing of glitter card and glue to the paper. Attach the ribbon across the paper using double sided tape onto the back of the paper. Attach a bow with a glue dot.
  7. Glue the paper onto the card front and attach the butterflies and small tag. Finally finish with touches of glitter glue and PVA pearls.

Tuesday 8 December 2015

Oriental Box created with the Floral Weave and Studded Lattice stamps from Chocolate Baroque

I created this sample for the recent TV shows from Chocolate Baroque on The Craft Channel. Lesley Wharton was fantastic and gave some wonderful demos using the new background stamps. They are so versatile for so many projects and styles.

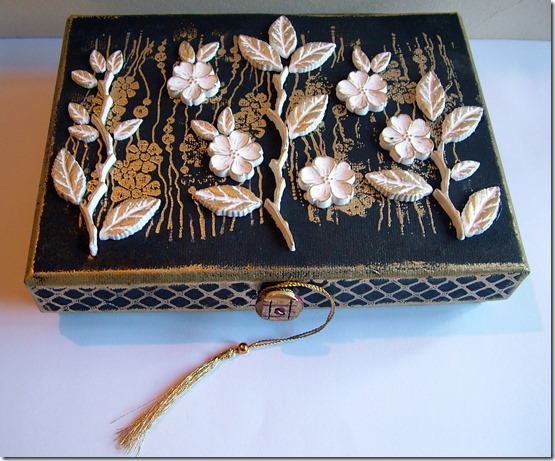
AW Oriental Box 1

I have had this box in my stash for some time. I used the lovely Floral Weave and Studded Lattice stamps to give it a complete make over in an Oriental style.

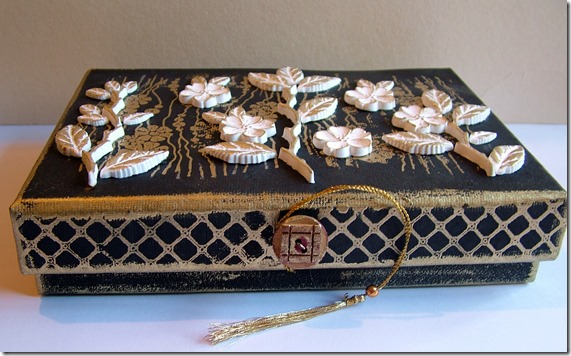
AW Oriental Box 2

Materials:

How it was made:

  1. Paint the box with black gesso.
  2. Stamp the lid with the Floral Weave stamp and emboss with the gold powder.
  3. Stamp the box edges with the Studded Lattice and emboss with gold powder. Then rub edges with a little gilding wax.
  4. Finally glue on the 3D elements to the lid top and rub over with a little gilding wax.
  5. My box already had the button and cord closure. You could add these yourself to a plain box to achieve a similar result. Take care when heat embossing if your button or cord is not heat tolerant.

Monday 7 December 2015

New Stamps from Chocolate Baroque

Lesley Wharton did a fantastic job of showcasing the new Chocolate Baroque stamps on The Craft Channel this weekend - brilliant demos.

Here are my samples created for the show. I will be blogging them over the next couple of weeks. Happy Monday All x. TV show 3 Montage

Friday 4 December 2015

Church Scene Card Created for Chocolate Baroque

Here is another of my designs created for the recent TV shows on the Craft Channel for Chocolate Baroque using the lovely scene building stamp sets - Country Views and Sunburst Scenes.

I love scene building. I disappear into a little fantasy world while creating these. This one would be suitable as a Wedding or Christening Card.

AW Church Scene

Materials:

  • Country Views and Sunburst Scenes stamp sets, Sentiment from A Little Bird Told Me set
  • White card blank 15 X 12cm and smooth white stamping card
  • Copy paper to create masks
  • Inkpads: Ranger Archival (Coffee), Distress Ink (Walnut Stain)
  • Fine marker pen and alcohol ink marker (dark brown)
  • Organza ribbon and PVA pearls (pink)
  • Adhesive, strong (red liner) double sided tape and glue dots

How to Make it:

  1. Cut a 9cm square with rounded corners from stamping card. Stamp the scene using Distress Ink. Use masks to cover the foreground images while stamping the ones behind in the background. Complete the scene by drawing using the fine brown pen.
  2. Colour the image by putting Distress Ink onto a tile or palette and picking up ink with a wet brush.
  3. Outline the edges of the topper with brown alcohol ink.
  4. Stamp the images and sentiment on the card blank with Archival Ink. Glue on the topper.
  5. Apply ribbon with double sided tape. NOTE: As the ribbon is fine dust it with a little talc after sticking down. This will stop any tape glue stickiness coming through the ribbon. Make a small bow and attach with a glue dot.
  6. Finally add PVA pearls and edge the card blank with brown alcohol pen.

I hope that you like my scenic project.

Anne x.

Thursday 3 December 2015

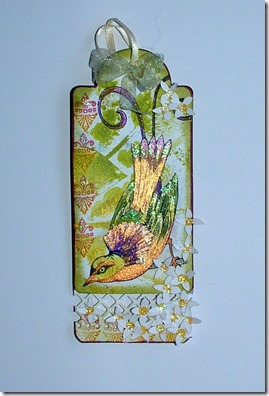
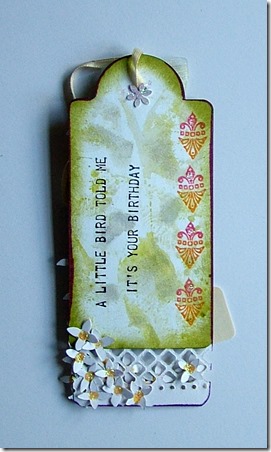
Pretty Little Tag Created using A Little Bird Told Me Stamp Set from Chocolate Baroque

Here is another of my designs created for the recent TV shows on the Craft Channel for Chocolate Baroque – using A Little Bird Told Me stamp set.

AW Little Bird Tag Front 2

Taken with a flash you can see the sparkling gold mica.

AW Little Bird Tag Front 1

Taken without flash you can see the gorgeous base colours of the paints.

AW Little Bird Tag Back 1

Materials:

  • A Little Bird Told Me stamp set
  • Leafy Stencil (Crafters Workshop 12 X 12 template)
  • White card tag
  • Inkpads: Versafine (Onyx Black), multicolour inkpad (pink/orange), Distress Ink (Peeled Paint)
  • Spritzers (green, blue and gold with mica)
  • Glitter markers (green, purple, pink and orange)
  • Pink acrylic paint with gold mica
  • Small offcut off a trellis die cut and small die cut flowers, satin and organza ribbons

How it was made:

The background was created by picking up spritzed ink off the stencil (after spraying though and colouring card for another project). The edges were inked with Distress Ink. The tag was extended with the trellis and the little motifs were then stamped with multicolour ink.

The bird and sentiment were stamped with Versafine Ink, and the birdie coloured with glitter pens and acrylic paint. Finally embellished with the tiny flowers and ribbons, then added a bit more sparkle with glitter glue.

Anne x.

Wednesday 2 December 2015

My Project for Chocolate Baroque Colour Challenge 17


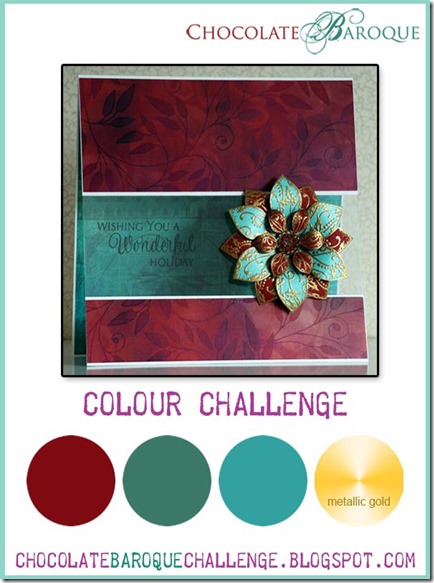
Here is the colour scheme provided for this months Challenge.

CBC_2015-03

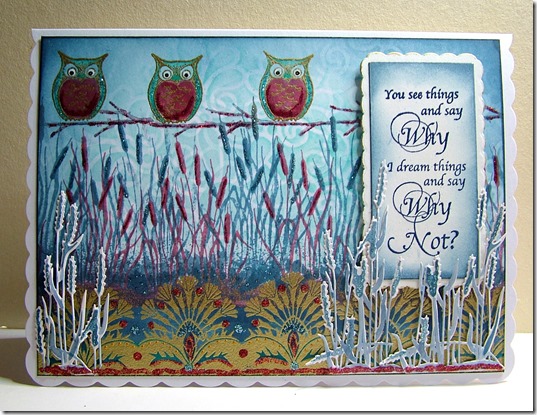
Here is my inspirational project for the Chocolate Baroque Colour Challenge 17. I used the lovely new Exquisite Edges and Owl Edges stamp sets to create this one.

AW Challenge 17

I hope that you like it – the owls are so much fun.

Materials:

  • Owl Edges, Exquisite Edges, and Words of Inspiration stamp sets
  • Crealies Masks and More – 101 (6 inch stencil)
  • A5 scalloped card blank, white stamping card
  • Inkpads: Distress Ink (Peacock Feathers, Stormy Sky), dye based inkpad (dark red/burgundy) and Versamark
  • WOW embossing powders (Gold Rich, and Earthtones Blueberry)
  • Glitter glues (blue-grey and dark red), PVA pearls (gold) and gold gilding wax
  • Alcohol marker (dark blue-grey), fine tipped black pen and white gel pen
  • Die cuts – rushes (Spellbinders) and to create sentiment mat
  • Adhesive and 3D glue gel

How to make it:

  1. Trim stamping card to fit the card front. Brush through stencil with Peacock Feathers Distress Ink to create a random swirled background. Using a sponge, emphasise the edges with Stormy Sky Distress Ink and edge the card with dark blue alcohol marker.
  2. Using Stormy Sky Distress Ink stamp the little branch along the top third of the card (leaving enough room for the owls). Next stamp the bulrushes across the centre, first with Stormy Sky and then, positioning slightly lower down, in the dark red ink.
  3. Using Versamark stamp the little owls and the bottom border. Heat emboss with gold. Tip: ensure that the card is fully dry and brush with antistatic powder before embossing. This will prevent stray powder sticking where you don’t want it.
  4. Colour the owls using Peacock Feathers and dark red inks, and fill in the bottom of the card with Stormy Sky using a water brush to pick up colours. The embossing will resist the ink. Use the fine tipped black and white markers to colour the owl eyes. Colour the die cut rushes with Stormy Sky Distress Ink. Tip: apply inks to your craft mat or a piece of acetate before picking up with a wet brush. Do not put a wet brush directly onto your inkpad or you will dilute them.
  5. Stamp the sentiment with Versamark and emboss with Blueberry powder. Ink the edges of the mat with Stormy Sky and blue alcohol pen. Mount onto scalloped background mat and edge with a little gold gilding wax.


I hope that you like my offering for this month’s Challenge. I am looking forward to seeing your creations. Good luck with the prize draw.

Anne x.

Tuesday 1 December 2015

Village Scene Created for Chocolate Baroque

Here is another of my designs created for the recent TV shows on the Craft Channel for Chocolate Baroque using the lovely scene building stamp sets - Country Views and Sunburst Scenes.

I have had so much fun creating these.

Anne x.

AW Village Scene

Materials:

How to make it:

  1. Stamp the scene using Versafine onto a piece of stamping card approx. 6 inch square. Use masks to cover the foreground images while stamping the ones behind in the background. Complete the scene by drawing with the fine black pen.
  2. Apply acrylic paint through the stencil to create leafy foliage around the border; grasses in the bottom foreground and overhanging leafy branches around the top and sides.
  3. Colour the image by putting Distress Ink onto a tile or palette and picking up ink with a wet brush.
  4. Glue the image onto white and black card to frame and layer onto the card front.

Dutch Scene Card using Country Views and Sunburst Scenes Created for Chocolate Baroque

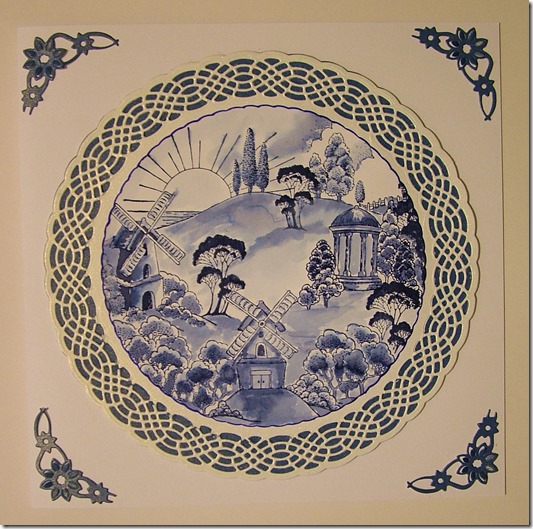
Here is another of my designs created for the recent TV shows on the Craft Channel for Chocolate Baroque using the lovely scene building stamp sets - Country Views and Sunburst Scenes.

I love scene building. I disappear into a fantasy world while creating these.

I hope that you like my Dutch inspired scenic project.

Anne x.

AW Dutch Blue Scene 1

Materials:

  • Country Views and Sunburst Scenes stamp sets
  • White card blank 20.5cm square, white stamping card, blue and white pearlescent card
  • Copy paper to create masks
  • Distress Inkpad (Chipped Sapphire)
  • Fine marker pen and alcohol ink marker (dark blue)
  • Adhesive

How to make it:

  1. Cut a decorative mat approx. 18cm diameter and back with blue card. Cut small corner elements in blue card. Cut circular topper approx. 13.5cm diameter from stamping card (to fit onto decorative mat).
  2. Stamp the scene using Distress Ink. Use masks to cover the foreground images while stamping the ones behind in the background. Complete the scene using the fine blue pen.
  3. Colour the image by putting Distress Ink onto a tile or palette and picking up ink with a wet brush.
  4. Outline the edges of the topper with blue alcohol ink.
  5. Glue decorative mat, corners and topper onto the card blank.