Tuesday 31 January 2017

Chocolate Baroque stamps are on Hochanda with a Pick of the Day tonight


Lesley Wharton has a special show this evening on Hochanda (starting at 8pm) featuring some fabulous and brand new scene building stamps from Chocolate Baroque. Here is a sneak peek of some of my show samples.


The shows are available on Freeview Channel 85, or you can watch online live or on catch up.

There are some gorgeous sets available as a ‘Pick of the Day’ bundle. They mix & match together so well that you really NEED them all. There is a lovely sentiment set too. They are exclusive to Hochanda for 10 days. After that you will be able to get them from the Chocolate Baroque website too.

Must go as I don’t want to miss Lesley’s demos and more samples from my Chocolate Baroque Teamies.

I will be blogging full details and tutorials for all my samples throughout Feb x.

Saturday 28 January 2017

Artistic Love card created for Chocolate Baroque


Here is another romantic themed card using the Harlequin Rose stamp set and the Belle Flowers background from Chocolate Baroque. The flowers were cut using Tattered Lace dies.
In my last post I used friendly plastic to create a textured heart. Here I have used texture paste.
 
Materials:
 
How to make it:
  1. Trim Kraft card and glue to the card front. Add ribbons to lower section.
  2. Spray stamping card with ink sprays to create background. Stamp the Belle Flowers background with black ink and colour with aqua pen and a water brush.
  3. Stamp the sentiment with sepia ink.
  4. Trim out the background and sentiment panel. Add Distress Ink to the edges and roughen up (using the edge of your scissors). Glue to the card front.
  5. Spread the texture gel over the stamp and leave to fully dry (overnight). Peel paste from stamp and trim around the heart with scissors. Brush over with starlight paints and then quickly wipe over with a damp cloth to remove paint on the upper surface levels (reveal the gold paste and leave the paint in the crevices). Leave to dry.
  6. Glue a doily and the heart to the card front. Add sticky pearl borders.
  7. Die cut the butterfly and flowers from coloured and waste background (ink spritzed) card. Touch up with inks to add some shading and texture.
  8. Shape flowers using a ball tool and foam mat. Glue to the card with 3D glue gel. Use 3D glue gel to add flower centres and sprinkle with glitter.

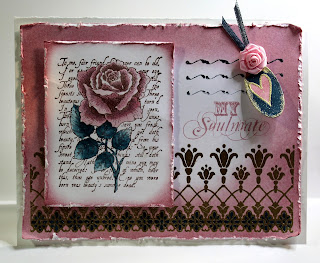
My Soulmate card card created for Chocolate Baroque


Good morning – here is another card with a romantic theme using the Harlequin Rose stamp set.
The heart was a bit of an experiment with friendly plastic. It is almost too good to be left on a card front. I think that I will adapt the project and create a piece of jewellery from it – it would be gorgeous as a pendant. I will share when I have had a chance to design and make it x.

Materials:
  • Harlequin Rose and Words of Love stamp sets
  • A5 cream card blank, cream hammered card, blue card
  • Alcohol marker and fine tipped pen (blue)
  • PVA pearls (gold)
  • Versafine Inkpad (Majestic Blue)
  • Organza (gold) and textured velvet (blue) ribbons
  • 3 strips of Friendly Plastic (pink, blue and mixed)
  • Pebeo Gilding Wax (Renaissance Gold)
How to make it:
  1. Trim blue and cream card to fit the card front. Stamp the border and sentiments with blue ink. Draw the faux stitching with the fine tipped pen.
  2. Edge the card blank with alcohol marker. Mat the topper onto blue card and glue to the card front. Add ribbon and bow.
  3. Trim the Friendly Plastic strips and lay them next to each other (touching) onto a Teflon sheet (or baking parchment). Heat the plastic using a heat gun until it just softens. Take care - waft the heat all around the piece to ensure evenly heated (i.e. not too much in one spot). You should see a change as it softens.
  4. Quickly press the stamp into the warmed plastic and leave to completely cool. Peel off the stamp and cut out the heart with scissors. Rub over the surface with gilding wax to highlight the texture.
  5. Glue on the heart with 3D glue gel. Finish with PVA pearls.

Friday 27 January 2017

My Love is Yours card created for Chocolate Baroque


Good morning. I am excited to share one of my samples for Lesley’s first TV shows on Hochanda at the start of the month. Lesley demonstrated several sets of stamps from Chocolate Baroque featuring a romantic theme with gorgeous roses and heartfelt sentiments. Great for creating projects for loved ones, Valentines Day, Weddings and Anniversaries too.

Materials:
How to make:

Stamp the rose panel twice in Pumice Stone Distress Ink. Trim and edge with alcohol marker.

Lightly colour the roses with Victorian Velvet Distress Ink and blot with kitchen towel (to stop the stamped image from bleeding too much). Stamp the sentiment with Distress Ink. Attach the ribbon and glue to the card front.

Stamp the hearts with Versamark and emboss with gold powder. Colour with watercolour pen and a water brush. Cut out and apply to the card front. The large leafy heart was attached with 3D foam for added depth.

Wednesday 18 January 2017

Belle Flowers card created for Chcoclate Baroque


I love this gorgeous background stamp (Big Bold Backgrounds – Belle Flower). I stamped it with Versamark onto white card and heat embossed the image with pearl green embossing powder. I then over stamped the border (from Harlequin Rose) and sentiment (from Rose Stem Script) and embossed with glittery pink powder. I drew around a large flower die with pink glitter pen to create the sentiment plate. Then coloured the image with watercolour and glitter pens.
Materials:
  • Big Bold Backgrounds – Belle Flower, Harlequin Rose and Rose Stem Script stamps
  • 6 X 6 inch card blank, white stamping card
  • Versamark Inkpad
  • Embossing powders: Pale green with mica and bright pink with glitter
  • Watercolour pens and water based glitter pens (greens and pinks)
  • Fine tipped glitter pen (pink) and alcohol markers (deep pink and pale grey)
  • Large floral shaped die (or template)
Step By Step:
  1. Stamp the background with Versamark ink and heat emboss with green powder.
  2. Over stamp the sentiment and border with Versamark and heat emboss with the pink powder.
  3. Draw around the floral template with the fine tipped glitter pen. Colour the background image with watercolour and glitter pens using a water brush to blend out colours.
  4. Use the grey alcohol marker to add a little shading under the sentiment plate to make it appear 3D.
  5. Trim the stamped image. Edge the card blank and topper with alcohol marker to frame and glue down.

Tuesday 17 January 2017

Infinite Love card created for Chocolate Baroque


Here is another romantic themed card using the lovely Harlequin Rose stamp set.
 
Materials:
 
How to make it:
  1. Stamp the main image with Versamark and emboss with gold powder. Colour the rose with sparkle pen.
  2. Draw faux stitching and edge the card with Distress Ink.
  3. Apply relief paste to the rose stamp with a palette knife. Leave to completely dry (overnight) and gently peel away from the stamp. Rub over the raised areas with a little gilding wax to highlight the texture. Glue to the card front.
  4. Finish with a bow and PVA pearls.

Our Love Rocks card created for Chocolate Baroque


Good morning – well it’s time to get romantic and send a bit of love. This monochrome rose card would be perfect for the guys. It would work for Valentine’s day or for an anniversary. I hope that you like it.
 
Materials:
 
How to make it:
  1. Cut a paper strip to create a mask for the sentiment border. Thin copy paper works best for this. You could apply a couple of dots of Zig 2 Way glue to the back to help hold it in place. If you do this wait for the glue to dry before placing. When dry this glue acts as a repositionable adhesive. Lay the mask across the card front and stamp the Rose Script 4 times with Versamark.
  2. Remove the mask and use a fine tipped pen to outline the sentiment strip. Edge the card with the alcohol marker. Stamp the sentiment and small heart.
  3. Stamp the Rose Script again onto stamping card. Colour with black pencil and cut out the rose. Use the shading on the stamp as a guide to colouring light and dark areas. Brush over the petal edges with the clear sparkle pen. Shape the rose slightly and glue to card front with 3D glue gel.
  4. Cut a decorative heart frame. I cut the heart from white stamping card using a die from Tattered Lace. I hand cut out the middle to create a frame and coloured with black alcohol marker. Trim the heart so that it appears to sit behind the sentiment strip when stuck down.
  5. Add Glossy Accents over the small heart and a little black glitter glue to the shaded areas of the rose. Finish with PVA pearls.

Sunday 15 January 2017

Quick and easy cards and tags created for Chocolate Baroque


Collage stamps are perfect for creating quick makes. This Harlequin Rose stamp is a brilliant example. The design is already done, no background, masking or composition to do – it has already been done for you. In addition the shading is all there so colouring is a breeze too.

I created these super quick makes by stamping the image with Versafine Ink (Onyx Black) which gives a sharp black waterproof image. I then simply coloured using watercolour pens, applying strongest colour into the darker shaded areas of the stamped image and dragging out the colour with a water brush. I mounted onto coloured card blanks to coordinate and frame the image.

Pre-cut tags were created in the same way. To finish I simply ran a black marker around the edge and added a coordinating ribbon.


Materials:

  • Harlequin Rose stamp set
  • 15 X 10.5cm card blanks (pink and blue), pre-cut white tags and white stamping card
  • Alcohol marker (black)
  • Watercolour pens (green, blue and pink)
  • Organza ribbon (pink and blue)

Saturday 14 January 2017

Leafy Trails card and gift box created for Chocolate Baroque


Good morning. I am excited to share one of my samples for Lesley’s first TV shows on Hochanda at the start of the month. Lesley demonstrated several sets of stamps from Chocolate Baroque featuring a romantic theme with gorgeous roses and heartfelt sentiments. Great for creating projects for loved ones, Valentines Day, Weddings and Anniversaries too.

I have used the Big Bold Backgrounds Leafy Trails stamp to create this card and to decorate a small gift box to match. I embellished using the Rose Stem Script stamp and a sentiment from the Words of Love set.

Materials:
* The gift box is a purse design from Silhouette – I think that it came included with the Silhouette Studio software

How to make:

Stamp the leafy background with Versamark and heat emboss with gold powder. Trim stamping card to fit the card blank leaving a small border. Round the corners with a punch or scissors. Edge with the alcohol marker.


Open out the box and lay flat. Mine was cut on the Silhouette Cameo, but you could use a die cut or a ready-made plain box. My box measured approx. 30 X 21 cm when opened out. Stamp and emboss the box sides with the leafy stamp.


Colour the card front and box with sparkle pens. Spray with a coat of sparkle varnish. Glue the background mat to the card front.

Cut a strip of card, stamp the sentiment and small border with teal ink. Trim and edge with alcohol pen. Attach to card front with 3D foam.


Stamp the rose panel in Versamark Ink and emboss with gold powder. Colour with watercolour and sparkle pens (both are water based so can be used together). Cut out the rose and lightly shape. Tie on a ribbon and glue to the card with 3D glue gel.

Wednesday 4 January 2017

Harlequin Rose card and gift box created for Chocolate Baroque


Good morning. I am excited to share one of my samples for Lesley’s first TV shows on Hochanda today. I am looking forward to being able to see more fabulous demos from this talented lady. Lesley will be bringing some gorgeous sets of stamps from Chocolate Baroque featuring a romantic theme with gorgeous roses and heartfelt sentiments. Great for creating projects ready for Valentines Day, but also suitable for Weddings and Anniversaries too.

I have used stamps from the Harlequin Rose set to create this card and to decorate a small gift box to match.

Materials:
*I used a GSD cutting file and cut the box on my Silhouette Cameo electronic cutting machine (CD86 Party Favour Boxes from Cocopopart).

How to make:

Trim stamping card to fit the card blank leaving a small border. Stamp the decorative border with Versamark and heat emboss with gold powder.


Open out the box and lay flat. Mine was cut on the Silhouette Cameo, but you could use a die cut or a ready-made plain box. My box measured approx. 20cm square when opened out. Stamp and emboss the box sides with the border stamp.

Colour the card front and box with Distress Ink using a sponge. Colour the border flowers with teal sparkle ink.

Stamp the sentiment onto the card front with Distress Ink. Stamp the mini border with teal ink. Distress the card edges and glue to the card front. I used the edge of my scissors to do this.


Stamp 2 mini tags with the small heart and emboss with gold, emboss along the edges too. Colour with Distress Ink and then with teal pen. Add ribbon and fabric rose and glue in place on the box and card.

Stamp the rose panel in Versafine ink and trim fit on the card front. Ink the card edges with Distress Ink and roughen.


Colour the leaves with teal and clear sparkle pens. Colour the rose with Distress Ink; applying to a palette and picking up colour with a water brush. Brush over the highlights with clear sparkle pen. Attach to the card front with 3D foam.