Friday 22 January 2016

Walled Garden Extended Scene Created for Chocolate Baroque

I created this sample for the recent TV shows from Chocolate Baroque on The Craft Channel. I love scene building stamps and this one is a beauty with the lovely rose draped arch and textured wall.  The Walled Garden stamp makes a great scene all on its own but is also great to use alongside the bonus silhouette stamp which fits perfectly into the arch creating added depth to the scene.

  I have used a bit of partial stamping and masking to extend the scene, and the bonus foliage stamp from Another Brick in the Walled Garden set. I hope that you like my offering. Happy crafting, Anne xxx. Materials:
  • Walled Garden, and Another Brick In The Walled Garden stamp sets
  • A5 card blank, watercolour card
  • Ranger Archival Inkpad (Coffee)
  • Wax crayons (pale browns), watercolour paints and white gel pen
  • Alcohol marker (black) and fine liner pen (brown)
  • Adhesive

How it was made:
  1. Stamped the scene onto watercolour card.
  2. Extended the scene using masking and partial stamping of different elements from the stamp. The left hand side of the scene was extended with the trees and more wall. More trees were placed in the foreground on the right, with more of the wall and pillar behind (while masking the foreground elements).
  3. The silhouette tree was repeat stamped into the archway to add more depth, and silhouette foliage added to the foreground. The scene was completed by drawing with the fine liner pen.
  4. Coloured with watercolours using wax crayons to add resist highlights to the brickwork and pathway. Used the white gel pen for additional highlights.
  5. Edged the card with the black marker to frame and glued to the card front.

Thursday 14 January 2016

Another Brick in the Walled Garden created for Chocolate Baroque

I created this sample for the recent TV shows from Chocolate Baroque on The Craft Channel. I love scene building stamps and this one is a beauty with the fruit tree and textured wall. The ‘Another Brick In The Walled Garden’ stamp makes a great scene all on its own but is also great to use alongside the bonus silhouette stamp, other scene building stamps, embossing folders and die cuts to extend the scene.
   I hope that you like my offering. Happy crafting, Anne xxx. Materials:
  • Another Brick In The Walled Garden stamp set
  • 8 X 8 card blank, watercolour paper, Kraft card
  • Brick textured embossing folder (Crafters Companion)
  • Ranger Archival Inkpad (Coffee)
  • Wax crayons (pale browns), watercolours and white gel pen
  • Alcohol markers (black, dark brown)
  • Clear glitter glue
  • Die cut leaves in green card (Sheena Douglass) and die cut flower coloured with alcohol markers
  • Adhesive, 3D foam pads and gel glue

How it was made:
  1. Inked the embossing folder and embossed the Kraft card. Cut out the central aperture using a craft knife. Trimmed to fit the card front and edged with black marker to frame.
  2. Stamped the scene onto watercolour card. Coloured with watercolour using wax crayons to add resist highlights to the brickwork. Used the white gel pen for additional highlights on the branches, foliage and window slats. Added a little sparkle glitter to the lemons.
  3. Edged the card blank with the brown marker. Aligned the watercolour behind the aperture and mounted using foam pads. Glued to the card front.
  4. Embellished with the die cut flowers and foliage.

Sunday 10 January 2016

Something New from Something Old, Fabric Applique Revamped Top

I loved the fit and style of this black top but spoiled it with splashes of bleach whilst cleaning. I recycled a few more items that were destined for the bin to revamp the top and disguise the bleach splashes. I love the new look – 70s retro and totally original. I hope that this inspires you to recycle and make New from Old.

I have entered this into the Simon Says Stamp Monday Challenge – Themed ‘Something New’ and featuring Tim Holtz products.

 
Materials:
  • Tim Holtz Tattered Florals BigZ die, Tim Holtz Mini Tattered Florals BigZ die, Sizzix  Flower Layers 4 BigZ die
  • General sewing thread and machine embroidery thread
  • Stitch & tear embroidery stabiliser
  • Sewing machine adjustable for free machine embroidery (dropped feed dogs)
  • Black T shirt, old long grey skirt, more old clothes in red and turquoise
How it was done:
  1. I first slit the ‘skirt’ of the T shirt into thin strips to create tassels. The ends were knotted to prevent unravelling. Pulling the strips made them curl into tasselled cords.
  2. I cut up the old grey skirt and stitched to make a new lining for the top.
  3. Dies were used to create the floral applique from 2 more old clothing items.
  4. I stitched the flowers in place with several rounds of free machining and embroidery thread. Stitch and tear was used on the back to stabilise while working. I didn’t bond the applique but left raw edges. Great tattered floral applique.

Steampunk Travels Card created for Chocolate Baroque

I created this sample for the recent TV shows from Chocolate Baroque on The Craft Channel.  I have used the Steampunk Travel stamp set. I had such fun making this one as I love Fantasy themes.  
 Happy Crafting, Anne xxx.  Materials:
How it was made:
  1. Stamped the images with black ink onto the patterned paper, using 2nd or 3rd generation stamping to create fainter background images.
  2. Coloured images with pencil and coated foreground images with Glossy Accents to highlight.
  3. Edged paper with Distress Ink. Layered and glued to card front.
  4. Coloured die cuts with blue and purple inks. Glued to card with 3D gel.

Saturday 9 January 2016

Steampunk Travel Turbine Created for Chocolate Baroque

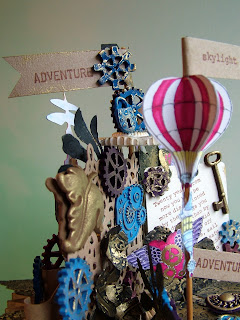
Today I am sharing my first book fold project. I have used the Steampunk Travel stamp set (recently featured on the Craft Channel TV show) to decorate and embellish. This one was quite a challenge, nobody saw me for days (tee hee), but I had enormous fun making it. I just love Fantasy themes.


  I hope that my project inspires you to play. Happy Crafting, Anne xxx.   Materials:
  • Steampunk Travel stamp set
  • Recycled paperback book (440 pages, 220 page folds) – 17.5 X 11cm size
  • White stamping card, Kraft card and black card
  • Inkpads: Memento (Tuxedo Black), Ranger Archival (Coffee)
  • Gilding wax and metallic pen (gold)
  • Alcohol ink pens (purples, lilac, dark reds and blues)
  • Dies and embossing folders to suit the Steampunk theme
  • Air dry paper clay and silicone moulds
  • Adhesive and 3D glue gel

Summary of how it was made:  · I created the book fold to make a shape resembling a turbine – suitable for the theme. First I used simple folding to create an upside down vase shape (adapted from instructions from Debbi Moore). I then added further folds and some cutting until I was happy with my ‘industrial’ shape. I glued a barbeque stick through the centre to provide a scaffold to build upon on the top.
 · I added a die cut lattice across the top which divided it into 2 halves. This provided and area to attach embellishments but also made it easier to design something that looks good from all angles. I didn’t want ugly backs of cut out stamped images to be obvious.  · Flowers and leaves were cut from black card, embossed to give texture, and rubbed over with gilding wax to make them look metallic. I also made lots of little embellishments using lightweight air dry paper clay and moulds. Images were stamped onto white card with black ink, coloured with alcohol pens, and cut out.


 ·

Friday 8 January 2016

Soutache Owl Tutorial Created for Beads Direct

Don't forget to check out my latest tutorial on the Beads Direct Blog.


http://www.beadsdirect.co.uk/blog/soutache-night-owl-by-anne-waller/

Card Created using the Baroque Orchids Stamp from Chocolate Baroque

I created this sample for the recent TV shows from Chocolate Baroque on The Craft Channel. Lesley Wharton was fantastic and gave some wonderful demos using the new background stamps. They are so versatile for so many projects and styles.  I just love this Baroque Orchids stamp – definitely turning into one of my favourites. Happy Crafting, Anne xxx.

 
  • I created this one using up scraps of pre-stamped card, black and white, printed with the Baroque Orchids stamp and turquoise acrylic paint.
  • I used Distress inks, Broken China and Stormy Sky, to ink the card edges.
  • The sentiment was stamped from the Card Sentiments clear set.
  • The flower was created using dies and coloured with alcohol ink pens.

Thursday 7 January 2016

Vintage Shabby Chic Floral Card created for Chocolate Baroque TV Show

I created this sample for the recent TV shows from Chocolate Baroque on The Craft Channel. Lesley Wharton was fantastic and gave some wonderful demos using the new background stamps. They are so versatile for so many projects and styles.

 
I used the Baroque Orchids and Open Weave stamps to create this Vintage Shabby Chic card. Materials:
  • Baroque Orchids and Open Weave stamps, Mackintosh Sentiments stamp set
  • A5 white card blank, white stamping card and pink vellum
  • Acrylic paint (pale aqua)
  • Inkpads: Versamark, dye base ink (pink), Distress Ink (Tattered Rose and Peacock Feathers)
  • Glitter sparkle embossing powder in white base
  • Clear glitter glue and PVA pearls (pale aqua)
  • Cut-N-Dry Foam and palette knife
  • Die cut and punched flowers, tag, mini doilies, swirls and leaves
  • Pink netting (Spider Web) and pink raffia
  • Oval Art Nouveaux die (Tonic)
  • Lattice embossing folder (Crafters Companion Embossalicious)
  • Adhesive and 3D glue gel
Brief Instructions:
  1. Stamp the white card and mini tag with the Baroque Orchids stamp and aqua acrylic paint. Cut decorative aperture into the stamped mat, distress the edges and curl. Add pink ink to the edges. Tie a bow onto the tag. Tip: Apply the paint to Cut-N-Dry foam with a palette knife, working well into the surface. Use this to apply to your stamp.
  2. Cut 2 oval mats from the vellum. Stamp using Versamark and the Open Weave stamp. Emboss with glitter powder.
  3. Emboss a strip of card with the embossing folder. Ink with blue ink to bring up the detail. Distress the edges, and edge with pink ink.
  4. Edge the card blank with pink ink. Glue all the mats and components to the card front. Embellish with the flowers and swirls.
  5. Finish with glitter glue and PVA pearls.
Happy Crafting, Anne xxx.

Wednesday 6 January 2016

Birthday Card Created with the new Digital Paper from Chocolate Baroque

There is another gorgeous free digital paper available on the Chocolate Baroque Challenge Blog. Here is what I created with mine.  
 Happy crafting, Anne xxx.

Materials:
Brief Instructions:
  1. Print and trim the digital paper to fit the card front leaving a border of white base card. Edge with black alcohol ink.
  2. Stamp the bird cage with Versamark and heat emboss with white powder. Colour with black fine liner pen.
  3. Stamp the window onto white card and cut out, including the window panes. Add some shading with a black pencil.
  4. Cut another piece of stamping card to fit behind the window. Stamp the scene and colour with pencils. Glue behind the window and attach onto the card front with 3D gel.
  5. Cut a strip of white card and draw lines with the fine marker to create the effect of a dado rail. Add shading with a black pencil. Glue to the card front.
  6. Stamp the sentiment with red ink, outline with fine black marker. Also edge the sentiment plate with black marker. Glue to the card front with 3D glue gel.
  7. Finish with the die cut flower and swirls, and PVA pearls.

Mixed Media Canvas using acrylic and special paints, die cuts and stamps


I created this canvas last summer and was delighted when it sold straight away (approx size 40cm square).

  • The background was created using acrylic paints and grass modelling paste (Viva Decor) for added texture.
  • Stencils were used to create the lacy border along the bottom and swirl textures in the background (Martha Stewart).
  • Further texture was added to the background with a hessian stamp (Heartfelt Creations).
  • The hexagons were cut from varying thicknesses of card and mount board using a hexagon quilting die (Sissix BigZ). White gesso was used to seal and prime them ready for painting.
  • Raised metallic outline elements were created using Mixtion Relief Paste and Metal Leaf (Pebeo).
  • Metallic gold acrylic paint, and specialist paints were then used to colour the hexagons and to create the ‘honey drizzles’ : ceramic and glass paints, Moon and Prisme (all from Pebeo).
  • Sentiments were printed from the computer and applied with Mod Podge.
  • Bees were stamped onto tissue paper and coloured with alcohol inks, and applied with Mod Podge.
  • Butterflies were cut from commercially printed papers (Heartfelt Creations).
  • Floral gears and leaves were cut using dies (Heartfelt Creations) and coloured with acrylic paints.
  • Additional flowers and swirls were cut using dies (Sissix BigZ) and coloured with Versamark and a mix of Gold and Verdigris embossing powders (WOW).
  • I created the larger interlocking gears using Silhouette software. They were cut from thick card, layered up and coloured with Versamark and a mix of Gold and Verdigris embossing powders.

I had such fun creating this one. I hope that you like it and that it inspires you to have a play with mixed media.

Happy Crafting, Anne xxx.