Monday 31 October 2016

Halloween Canvas using the Day Of The Dead Collection from Sheena Douglass


Oooh I do love Halloween. I so enjoy making spooky projects. I created this canvas for a couple of my friends. I used Sheena Douglass ‘Day Of The Dead’ stamps and dies, and I coloured the image so it looked like them. I also used Sheena’s Festive Ivy and Christmas Foliage dies to decorate.

Materials:
  • Stretched canvas approx. A4 size
  • A4 sheet white stamping card (Sheena Douglass)
  • Black, white and green card
  • Brother ScanNCut CM300 machine
  • Silhouette Cameo machine
  • Die cutting machine (EBosser)
  • Sheena Douglass Day Of The Dead Collection (Eternal Love stamp and Dancing Skeleton, and Pawprint memories dies)
  • Sheena Douglass dies (Festive Ivy and Christmas Foliage)
  • Other dies: acorn (Spellbinders) and leaves (Tattered Lace)
  • ScanNCut files: built in designs for the ‘Happy’ and ‘Halloween’ text
  • Silhouette files: JM Rush for spiders (Spider Web Lantern), Bats Flying and Spooky Banner
  • Gesso (black)
  • Inkpads: Versafine (Tuxedo Black), Distress (Gathered Twigs and Tea Dye)
  • Spray and Sparkle (Crafters Companion Diamond Pearl)
  • Pebeo Gilding Wax (King Gold)
  • Spectrum Aqua watercolour pens (pinks, oranges, greens, teals, turquoises, greys, yellows and reds)
  • Brown pencil (to colour bats)
  • Black fine tipped marker (to enhance shading & detail to stamped image)
  • Stickles glitter glue (Crystal)

Cemetery Halloween Lantern created on the Silhouette Cameo


I created this Halloween lantern using my Silhouette Cameo and files from Carina Gardner (from the Silhouette store).

I had so much fun creating these and they are a quick make (compared to the other lanterns – see my posts below).

Carina has a range of spooky candle holders in the Silhouette Store . All are easy to construct, so great for last minute makes to decorate on Halloween Eve.

Materials:
  • Silhouette Files: Cemetery Candle Holder by Carina Gardner (downloaded from the Silhouette store)
  • Silhouette Cameo cutting machine
  • 1 X A4 (approx 8.25 X 11.75 inch) sheet black card
  • 1 X A4 sheet vellum for each (yellow)
  • Stickles glitter glue (Crystal)
  • Battery operated tea light or candle (flameless)
How to make it:

Cut the lantern in black card and the liner from coloured vellum. It is very easy to make as there is just one piece each for outer and inner liner. Construct by applying glue to the tabs.
Finish with glitter glue on the trees for a bit of sparkle.

Sail Away quick and easy card created for Chocolate Baroque


Good morning – I love stamping directly onto pretty background papers to produce quick and easy cards – great if you need to put something together in a hurry.

I stamped elements from the Seashell Collage and flying gulls from the Landscape Edges stamp sets using Archival Ink (Coffee) onto one of the pretty background papers from Crafty Individuals (Book 5 – Travels in Italy). The sentiment is from the Steampunk Travel set, and was heat embossed with white powder. I added a few details with a fine liner pen and quickly coloured some areas with brown pencil. I also blended a little pink dye ink around the edges and over the sentiment to make it stand out – the white embossing resists the ink colour.

Materials:
How to make it:
  1. Trim the paper down slightly (approx. 14.5cm square) and stamp the scene using Archival Coffee Ink. Add some quick colouring to the gulls and wooden posts using brown pencil.
  2. Stamp the sentiment with Versamark Ink and heat emboss with the white powder.
  3. Draw in some faux stitching around the sentiment to extend the scene (just add a few wavy lines) using the fine tipped pen.
  4. Blend pink ink in from the corners and over the sentiment to make it stand out more (the white embossing will resist the ink).
  5. Use the marker to outline and frame the edges and glue to the card front.

Lone Tree quick and easy card created for Chocolate Baroque


Good morning – I love stamping directly onto pretty background papers to produce quick and easy cards – great if you need to put something together in a hurry.

I stamped the tree from the Spinney Design-A-Tree stamp set and heat embossed with sparkly powder onto one of the pretty background papers from Crafty Individuals (Book 5 – Travels in Italy). I then added a ribbon and bow and PVA pearls – all done in a jiffy.

Materials:
How to make it:
  1. Trim the paper down slightly (approx. 14.5cm square) and stamp the tree using Versamark. Heat emboss with the sparkly powder.
  2. Use the marker to outline and frame the edges.
  3. Add the ribbon and bow (use tape to fix to the back of the paper) and glue to the card front.
  4. Finish with PVA pearls.

Saturday 29 October 2016

Skull and Spider Web Tea Light Lanterns created on the Silhouette Cameo


I created these Halloween lanterns using my Silhouette Cameo and files from Jennifer Rush Designs (from the Silhouette store). I also used the Festive Ivy die from Sheena Douglass to decorate.
I had so much fun creating these. Off to get some more spooky projects finished.
Materials:
  • Silhouette Files: Spider Web Lantern and Skull Lantern from JM Rush Designs (downloaded from the Silhouette store)
  • Silhouette Cameo cutting machine
  • 4 X A4 (approx 8.25 X 11.75 inch) sheets black card for each lantern
  • 1 X A4 sheet white card (for skulls)
  • 1 X A4 sheet vellum for each (orange or yellow)
  • Festive Ivy die (Sheena Douglass)
  • Stickles glitter glue (Crystal and Icicle)
  • Pebeo gilding wax (King Gold, Empire Gold and Silver)
How to make them:
  1. Cut the lanterns and web layers from black card. Cut the windows from coloured vellum. Cut the skulls from white card. Construct following the instructions on Jennifer’s tutorial blog posts (links in the materials list above).
  2. Rub gilding wax over the lanterns, buff up when dry to give them a metallic effect. You may find this easier to do before adding the web frames.
  3. Die cut and emboss the ivy from black card. Rub over sparingly with gold gilding wax to give a metallic effect. Shape with a ball tool and glue in place to decorate the lanterns.
  4. Finish with glitter glue for a bit of sparkle.

Halloween pumpkin tea light holder created on the Brother ScanNCut


I created this pumpkin lantern using my Brother ScanNCut and the Jack O’ Lantern SVG files from the Haunted Forest Collection (SVG Cuts). I used oriental papers and the Festive Ivy die from Sheena Douglass to decorate.

I had so much fun creating this. It looks lovely with the flickering electric tea light (no flame) glowing from inside. It would also work well if filled with sweeties for Trick or Treat callers.

I love this collection of SVG files and think that I will create the magnificent Haunted House next.


Materials:

SVG cutting files – Jack O’ Lantern from the Haunted Forest Collection (SVG Cuts)

Brother ScanNCut CM300 cutting machine

2 sheets 12 X 12 inch card (1X black, 1X orange - Tonic)

1 X A4 (8.25 X 11.75 inches) black paper

Patterned papers (thin card): 2X A4 double sided pattern for pumpkin and flowers, 1 X A4 for hat panels (Sheena Douglass Oriental Collection)

Festive Ivy die (Sheena Douglass)

Stickles glitter glue (Crystal)

Pebeo gilding wax (King Gold)


How to make it:

Cut the pumpkin from orange card.

Cut the flowers and the pumpkin panels from decorative card.

Cut the hat from black card and hat panels from contrasting patterned card.

There is a fabulous video on YouTube by SVG cuts on how to construct all the elements for this collection (SVG Cuts Haunted Forest Tutorial Video). Construct and glue together following the tutorial. I used a ball tool and embossing mat to shape my floral elements.

Die cut and emboss the ivy from black paper (I used 4 layers of paper in one pass). Rub over with gilding wax to give a metallic effect.  Shape with a ball tool and glue in place to decorate the hat.

Finish with glitter glue for a bit of sparkle.

Halloween Tea Light Holders cut on my Silhouette Cameo and Brother ScanNCut


I have been making some Halloween electric tea light holders using my cutting machines. The skull and spider lanterns were cut on my Silhouette Cameo using files from JM Rush (from the Silhouette store), the pumpkin lantern was cut on my Brother ScanNCut with files from SVG cuts (Haunted Forest Collection). I used some oriental papers and the Festive Ivy die from Sheena Douglass to decorate.

Working on some more spooky projects today.

Will be blogging later if anyone wants more info and links to the files and details of materials used etc. xxx

Thursday 27 October 2016

Floral Card created with Brother ScanNCut embossing on parchment


Good morning. I have just been playing with the new embossing kit for the Brother ScanNCut. I love it. I made this for one of my lovely crafting friends.

Have you seen the deal on the ScanNCut CM900 at the moment? Create & Craft Club members get a 20% discount. FAB price and includes lots of extras including luxury card bundle.

Materials:
  • ScanNCut CM300 machine
  • ScanNCut Embossing Starter Kit
  • Design activation card for ScanNCut (included in starter kit)
  • ScanNCut Canvas web App
  • ScanNCut standard mat
  • Parchment (Create & Craft)
  • 8 X 8 inch white card blank (Lynda Chapman)
  • 7.5 X 7.5 inch pink patterned paper (DCWV Floral Stack)
  • Floral corner punch (EK Tools Eden set)
  • Pergamano Pricking tools (scallop and 2 pin)
  • Approx. 3mm ball hand embossing tool
  • Alcohol ink markers (light green and pink)
  • Used tumble drier sheet
  • Pergaglue and acrylic glue
  • Pergamano mapping pen and sticky ink
  • Fine crystal glitter
  • Parchment embossing and pricking mat
  • Pergamano snips
How it was done:
 
Screen shot of the design on ScanNCut Canvas:

  1. I activated the embossing designs in ScanNCut canvas (from the activation card included in the embossing starter kit). I created a new project and loaded designs to the mat: floral spray (LE-A06) and Text (LE_D03) line embossing designs, and the border from the basic shapes. I copied and pasted the floral spray and arranged the designs on the mat and downloaded to a USB stick.
  2. I loaded onto the machine, grouped the designs and adjusted the size to approx. 7 inches square to fit my card blank.
  3. I attached my embossing mat to a new standard tack mat. Note: take care when sticking down – avoid creating air bubbles. When I first tried the embossing my parchment ripped. When I check it was where I had large air bubbles beneath my mat. It was a little tricky to peel off again. I was worried that it was stretching as I pulled it off the mat but it soon regained it’s shape ok. When finished I left the embossing mat in place before covering and storing for future use.
  4. I then embossed the design using speed set at 1 and pressure at -2 with the smallest embossing tool. I rubbed over the parchment with the tumble drier sheet before embossing (this helps the ball tool to glide more easily). Without unloading the mat I repeated using a pressure of -1. I was delighted with the results.
  5. I repeated embossing the floral sprays for cutting out and decoupage.
  6. I then manually embossed on the back with a ball tool to add a little shading to the leaves and flowers.
  7. I coloured the leaves and flowers on the back with alcohol pens to add some subtle colour.
  8. I pierced around the outside of the frame using the scallop piercing tool (from the front), and around the extra flowers with the twin piercing tool, ready to cut out.
  9. I cut around the frame and extra flowers using Pergamano snips. I am a parchment novice and really struggle with getting a neat little picot snip. I know the theory but I guess practice will make perfect. Tip: With handle end overhanging the waste side (i.e. the bit you want to trim away) put the scissor points into 2 adjacent holes. Careful not to go too deep (definitely one of my problems) – you snip using the very tips of the scissors. Lower the scissors so that they are angled flat to the parchment, twist slightly and snip.
  10. I outlined my card blank with green alcohol pen, punched the corners of my decorative paper and glued down. The parchment was glued down using Pergaglue – a tiny dot on the frame borders and behind the flower centres.
  11. I then lightly shaped the flowers, added a little more pink alcohol pen around the snipped edges, and glued in place.
  12. I using the mapping pen and sticky ink to draw over the lettering and flower centres, then added fine glitter for a bit of sparkle. I added dots of Pergaglue onto the frame borders and glittered. This dried to give little 3D glittery ‘gems’.

Butterfly card created for Chocolate Baroque Colour Challenge 28


Good morning. Today I am sharing my contribution to the Colour Challenge this month. I am just loving these colours. Did you catch any of the shows recently on The Craft Channel where Lesley demonstrated the use of Angelina fibres? The butterfly stamps are just perfect for this technique.

I coloured a decorative card blank and tag with spray inks and made the floral embellishment from the waste pieces. I used stamps from Just Butterflies, Butterfly Blush and Mackintosh Sentiments stamp sets. The sparkling 3D butterfly was created by inking the stamp with black ink, overlaying with Angelina fibres and baking parchment, then ironing briefly on a hot setting. Note: Lesley recommends Black Archival Ink (Ranger). Mine did not work too well. However, I did manage to rescue it using a fine tipped alcohol ink pen to redraw my rather faint image.

I used a die cut scalloped circle (dark blue), ribbon, faux gems and glitter glue to finish.

Materials:
  • Just Butterflies, Butterfly Blush and Mackintosh Sentiments stamp sets
  • Decorative card blank, watercolour card tag, dark blue card
  • Spray inks (light and dark blue, lime and yellow)
  • Dye based inkpads (dark blue and black) – important: see note above
  • Glitter pens (green and blue)
  • Angelina fibre (Mint)
  • Baking parchment and iron
  • Organza ribbon and faux gems (blue)
  • Alcohol marker (dark blue) and fine tipped marker (black)
  • Glitter glue (light blue)
  • Scalloped circle die (Tonic)
  • High tac acrylic glue and 3D glue gel
How to make it:
  1. Spritz the tag with light and dark blue inks. Stamp the sentiment with dark blue ink. Edge the tag with alcohol marker to frame.
  2. Spritz the card blank with green, light blue and yellow inks. Note: I thought that the waste elements would make lovely petals. I left them in place while spritzing then used them to make a 3D flower. Alternatively you could spritz a ready-made paper flower to match.
  3. Stamp the butterflies and sentiment with blue ink. Colour with glitter pens.
  4. Ink up the large butterfly with black ink and overlay with Angelina fibres. Cover with baking parchment and iron on a hot setting without steam for a few seconds. If using the recommended Archival Ink you should see the image appear through the parchment – it will then be ready. Peel away from the parchment and trim out the butterfly. I made a bit of a mess of mine! I used Memento ink and it left a fairly feint image. To rescue it I used a fine tipped black marker to go back over the image and make it more visible. I made 2 butterflies to layer up.
  5. Add a dark blue scalloped circle behind the decorative card front, add a ribbon and bow, glue everything together and finish with glitter glue.

Saturday 22 October 2016

Christmas Birches card created for Chocolate Baroque


Good morning. I have had some little Xmas bauble stickers in my stash for years and thought that they would be perfect hanging from the Tangled Birch for a Christmas card. Think that I will make a few more of these and get my stickers used up.

Unfortunately I had a little trouble photographing this one. It is mounted on shiny mirror card and has lots of sparkly glitter texture which is very difficult to see in the photo. It looks lovely in real life. It would still work without the baubles, or perhaps with some gems of die cut snowflakes. I hope that you like it.

Materials:
  • Tangled Birch stamp and sentiment from Christmas Candlelight
  • 12 X 17cm black card blank, silver mirror card and white stamping card
  • Ink sprays (blue, yellow, orange, opaque white and clear mica)
  • Inkpads: Versamark and Memento (Tuxedo Black)
  • Heat embossing powder (silver with glitter)
  • Alcohol markers (black, mid and light grey)
  • Watercolour pen (yellow)
  • Glitter pens (red and green)
  • Christmas bauble peel off stickers
  • Fine crystal glitter
How to make it:
  1. Stamp the tree and heat emboss with sparkly powder.
  2. Cut a small circle to act as a mask and spritz the background with sprays. Remove the mask and colour the moon with yellow watercolour pen.
  3. Add touches of colour to the stamped image with glitter pens. Add some shading around the outside of the trees and at the base of the scene with grey alcohol marker.
  4. Trim the card, outline with black marker, mount onto mirror card and glue to the card front. Stick down the baubles.
  5. Stamp the Christmas banner with Memento ink. Colour with alcohol and glitter pens. Cut out and glue to the card front.
  6. Finish with fine crystal glitter on the foreground and tree branches.

Wednesday 19 October 2016

Baroque Orchids for Chocolate Baroque Colour Challenge 28


Good morning. I have so loved creating projects using the Challenge Colours this month. Here I have used the gorgeous Baroque Orchids stamp plate. I stamped it twice in pale blue on the background panel, and in black for the foreground panel. I stamped it again, coloured and cut out 3 of the orchid elements, shaped them and decoupaged them onto the main panel. I blended some die ink around the edges, added ribbon and a couple of die cuts and faux gems to finish – ooh and a bit of glitter glue of course (I go through gallons of it – tee hee).

Note: I actually used acrylic paint for stamping here, which will resist the dye inks blended in from the edges. I made these panels whilst doing some stamping on fabric so created some spare backgrounds on card to use up the paint. Heat embossing powders would give a similar effect. If you use dye inks for stamping you will lose the stamping detail on the edges of the lighter coloured panel.
Looking forward to seeing your creations, Anne x.

Materials:
  • Baroque Orchids stamp
  • A5 white card blank (approx. 21 X 15cm)
  • A4 sheet of white stamping card
  • Acrylic paints (pale blue and black)
  • Cut-N-Dry Foam
  • Dye based inkpad (blue)
  • Glitter pens (green, light and dark blue, yellow)
  • Alcohol marker (dark blue)
  • Ribbons (blue and green)
  • Die cuts to coordinate (Sizzix)
  • Faux gems (green) and glitter glue (pale blue)
  • 3D glue gel
How to make it:
  1. Cut the A4 stamping card in half and stamp the panel twice with light blue and with black acrylic paint using Cut-N-Dry foam.
  2. Trim the light blue panel (approx. 19.5 X 13.5cm), edge with alcohol marker and dye ink, and glue to the card front.
  3. Colour the swirls on one of the black panels, and 3 of the orchids on the other panel. Trim the background panel, edge with blue marker and ink, and glue to the card front.
  4. Trim out the coloured orchids, shape with a ball tool and embossing mat (or with fingers), and glue to the card with 3D glue gel.
  5. Add ribbon, bow and die cuts. Finish with faux gems and glitter glue.

Saturday 15 October 2016

Quick and Easy Butterfly Cards created for Chocolate Baroque


Good morning – I love stamping directly onto pretty background papers to produce quick and easy cards – great if you need to put something together in a hurry. I have created 2 variations using the Patchwork Butterfly stamp from Chocolate Baroque with one of the pretty background papers from Crafty Individuals (Book 5 – Travels in Italy). I stamped the butterflies and heat embossed them with pink sparkly embossing powder, then quickly coloured with watercolour and glitter pens. To give them a bit more depth I added a quick drop shadow around them using pencil. To finish I added a few highlights with white gel pen and a little glitter glue for added sparkle.

Materials:
  • Patchwork Butterfly stamp set
  • 6 X 6 inch white card blank
  • 6 X 6 inch backing paper from Crafty Individuals (Book 5 – Travels in Italy)
  • Versamark Inkpad
  • WOW embossing powder (Florida Sunset – pink with gold glitter)
  • Alcohol markers (dark green, dark red)
  • Watercolour and glitter pens (green and yellow, purple and pink)
  • Opaque gel pen (white)
  • Pencil (grey)
  • Clear glitter glue and PVA pearls
How to make it:
  1. Trim the paper slightly to fit the card and edge with alcohol pen to frame.
  2. Stamp the butterfly with Versamark ink and heat emboss with glitter powder.
  3. Quickly colour with watercolour and glitter pens – the embossed areas resist the pens so colouring is really quick and easy. Add some highlights with white pen.
  4. Outline with pencil to add a drop shadow and make the butterflies stand out from the background.
  5. Glue to the card front and add glitter glue and PVA pearls to finish.

Monday 10 October 2016

Autumn Medley Stepper Card created for Chocolate Baroque

Good morning. Today I have an Autumnal project to share with you. I simply love this Autumn Medley stamp. I have used an acorn die from my stash but elements could be cut out and decoupaged from the stamped image too.


Materials:
  • Autumn Medley and Mackintosh Sentiments stamps
  • A5 ready made stepper card, white stamping card, A4 thick cartridge paper and waste shredded paper
  • WOW embossing powders (extra fine White and Metallic Gold Sparkle)
  • Inkpads: Versamark, Versafine (Vintage Sepia), dye based (dark brown)
  • Ink Spritzers: Reds, oranges, yellows and greens – some with gold mica (Mr Huey’s and Lindy’s Stamp Gang)
  • Dye based inks: Orange and yellow (Spectrum Noir Aquatints)
  • Watercolours with mica: Reds, oranges, yellows, browns and greens (Twinkling H2O’s)
  • Alcohol ink marker and pencil (dark brown)
  • Paper raffia (yellow)
  • Dies: Acorns (Spellbinders), square (Tattered Lace Torn Edge), mini tags (Create & Craft Couture Deco Boutique Collection)
  • 3D glue gel
How to make it:
  1. Spritz the cartridge paper and waste paper strips with autumnal coloured inks and leave to dry. Trim the background panel, edge with brown marker and glue to the card front. Die cut tags and acorns from the remainder.
  2. Edge the mini tag and sentiment panel with brown marker. Stamp the sentiments with Versamark and heat emboss with white powder.
  3. Add some shading to the acorn and leaf die cuts using the brown dye based ink, and shape using a ball tool and embossing mat.
  4. Stamp the Autumn Medley onto stamping card using Versafine. Quickly add gold sparkle embossing powder to the hair (avoiding the face) and heat emboss. Colour with watercolours (with mica) and inks. Use the brown pencil to add extra shading.
  5. Lay the square die onto the image and mark the position of the overhang and trim around with a craft knife (i.e. the foliage and hair that extends beyond the die edge). Lay the overhang behind the die cutting edge (so it won’t cut through) and cut out the square. Edge with brown marker and blend brown ink in from around the edges.
  6. Scrunch up a bundle of the waste paper strips and raffia and lay the die cut topper over the top. Put everything together using 3D glue gel.

Sunday 9 October 2016

Matchbox Diorama Reindeer Scene show sample created with Cutting Craftorium Christmas USB (SVG Files)

Brother ScanNCut shows coming on Create & Craft TV tomorrow with new Christmas SVG files from the Cutting Craftorium. There is also a coordinating CD with fabulous printables, and a bundle (CD and USB) with both collections.


There is so much on this Christmas USB for creating 3D home decor items for Christmas: sleigh, reindeer, rocking horse, boxes, napkin rings, lantern, crackers, cake stands, and wreaths but to name a few. I have not seen the optional CD with images and background papers to coordinate with the cutting files – will have to catch the shows tomorrow. It will probably be a must to add to my Christmas crafting collection.

This is a fabulous set of cutting files in SVG format. SVG files are so versatile and can be used on many other electronic cutters, not just the Brother ScanNCut, e.g. Silhouette (with the Designer Edition software).

Here is a brief tutorial for my version of the Matchbox Diorama - TV show sample for tomorrow. Anne x.

Materials:
  • Christmas USB (SVG files) from the Cutting Craftorium
  • Brother ScanNCut CM300 cutting machine
  • Card approx 220gsm: White, light blue, dark blue, Kraft card and Aqua glitter card
  • Waste star cut from the star cake stand (light blue)*
  • Fake snow (Pinflair Snow Dust)
  • Brown pencil and fine tipped metallic silver pen
  • Glitter glue (crystal clear)
  • Faux gems and organza ribbon (aqua)
  • Acrylic glue (Cosmic Shimmer), 3D glue gel (Pinflair)
*I saved this piece from my Victorian Lantern project (see post below). Alternatively cut a star from one of the machine inbuilt designs to make the sentiment panel.

How to make it:

It is a bit tricky to write an exact step by step but hopefully I have given enough info for you to make something similar and adapt it to your own taste x.

Generally my settings for around 220 gsm card is: Speed 5, cut pressure 0 or 1, blade depth 5 or 6. It will vary with card thickness and structure (density etc.). If you are a newbie, or trying out a new batch of card, use the test cut function to try out settings – then record for future reference.

I used the Matchbox Diorama files to create this project.
  1. Cut the Matchbox Drawer in white card (wait before gluing).
  2. Cut the Matchbox Wrap in Kraft card.
  3. Cut the Matchbox Cover (Noel) in white, light blue and glitter card. Glue down the light blue layer onto the Matchbox. Snip away the swirly sections on the white cut out, leaving the border and snowflakes (keep the waste pieces). Glue on top and add gems and bow. Finally snip out the lettering from the glitter card panel and glue in place. Make up the box wrap.
  4. Now cut the elements from the Woodland Reindeer Scene folder. Cut 2 reindeer (Layer 4) from Kraft card. Snip away the antlers from one. Add a little shading with brown pencil and clear glitter glue for sparkle.
  5. Cut 1 each of the grass border (Layer 5), trees (Layer 2) and the foliage (Layer 3) from light blue card.
  6. Load the background (Layer 1) and add a circle (inbuilt machine pattern) to the bottom right, adjust the size to make a moon, and weld. Cut X1 from dark blue card.
  7. Hand cut a panel to fit into the base from the glitter card (or use a rectangle shape from the machine patterns and resize). You want it to have a little clearance all around so cut it approx. 2mm smaller than the box base. Glue in place. Next fold the tabs back on the back panel and box, glue in place and make up the box at this stage.
  8. Next build up all the layers and glue in place. Add a couple of swirls from the box top waste. Write a sentiment on the star with the silver marker. Finally finish with plenty of fake snow and glitter glue.

Poinsettia T Light created with Cutting Craftorium SVG files available on Create & Craft TV tomorrow

Brother ScanNCut shows coming on Create & Craft TV tomorrow with new Christmas SVG files from the Cutting Craftorium. There is also a coordinating CD with fabulous printables, and a bundle (CD and USB) with both collections.


There is so much on this Christmas USB for creating 3D home decor items for Christmas: sleigh, reindeer, rocking horse, boxes, napkin rings, lantern, crackers, cake stands, and wreaths but to name a few. I have not seen the optional CD with images and background papers to coordinate with the cutting files – will have to catch the shows tomorrow. It will probably be a must to add to my Christmas crafting collection.

This is a fabulous set of cutting files in SVG format. SVG files are so versatile and can be used on many other electronic cutters, not just the Brother ScanNCut, e.g. Silhouette (with the Designer Edition software). There is a great deal on the ScanNCut machine too!

Here is a brief tutorial for Poinsettia T Light TV show sample. Anne x.

Materials:
  • Christmas USB (SVG files) from the Cutting Craftorium
  • Brother ScanNCut CM300 cutting machine
  • Card approx 220gsm: White, light blue, Kraft card
  • Battery operated T Light
  • Thick card coaster
  • Fake snow (Pinflair Snow Dust)
  • Brown pencil
  • Glitter glue (crystal clear)
  • Acrylic glue (Cosmic Shimmer), 3D glue gel (Pinflair) and red liner tape (strong double sided)
How to make it:
It is a bit tricky to write an exact step by step but hopefully I have given enough info for you to make something similar and adapt it to your own taste x.

Generally my settings for around 220 gsm card is: Speed 5, cut pressure 0 or 1, blade depth 5 or 6. It will vary with card thickness and structure (density etc.). If you are a newbie, or trying out a new batch of card, use the test cut function to try out settings – then record for future reference.

Note: I have edited and resized various files to create this project. Remember to save the files as you go so that you can use them again. It also enables you to reload designs as you go to judge and resize subsequent pieces.
  1. I used elements from the Matchbox Diorama (Woodland Reindeer Scene) to decorate the candle: Load the reindeer (Layer 4) and cut X3. Add a little shading with brown pencil and clear glitter glue for sparkle.
  2. Load the grass border (Layer 5), resize to wrap around the T Light and cut from blue card. Use double sided tape to cover the candle.
  3. Load the trees (Layer 2), and the foliage (Layer 3) and cut X1 from blue card. Trim the frame away from the tree sections and glue 2 halves together to make the tree. Trim the tabs away from the foliage. Glue the reindeer, tree and foliage in place around the candle. Add glitter glue and fake snow.
  4. Cut the Poinsettia in white card, Poinsettia Foliage (Poinsettia folder) in blue card. Shape the elements lightly, layer up as desired and glue to the coaster (the candle sits on the poinsettia centre).
  5. Finally finish with plenty of fake snow and glitter glue.


Victorian Lantern created with Cutting Craftorium SVG files available on Create & Craft TV tomorrow

Brother ScanNCut shows coming on Create & Craft TV tomorrow with new Christmas SVG files from the Cutting Craftorium. There is also a coordinating CD with fabulous printables, and a bundle (CD and USB) with both collections.


There is so much on this Christmas USB for creating 3D home decor items for Christmas: sleigh, reindeer, rocking horse, boxes, napkin rings, lantern, crackers, cake stands, and wreaths but to name a few. I have not seen the optional CD with images and background papers to coordinate with the cutting files – will have to catch the shows tomorrow. It will probably be a must to add to my Christmas crafting collection.

This is a fabulous set of cutting files in SVG format. SVG files are so versatile and can be used on many other electronic cutters, not just the Brother ScanNCut, e.g. Silhouette (with the Designer Edition software). There is a great deal on the ScanNCut machine too!

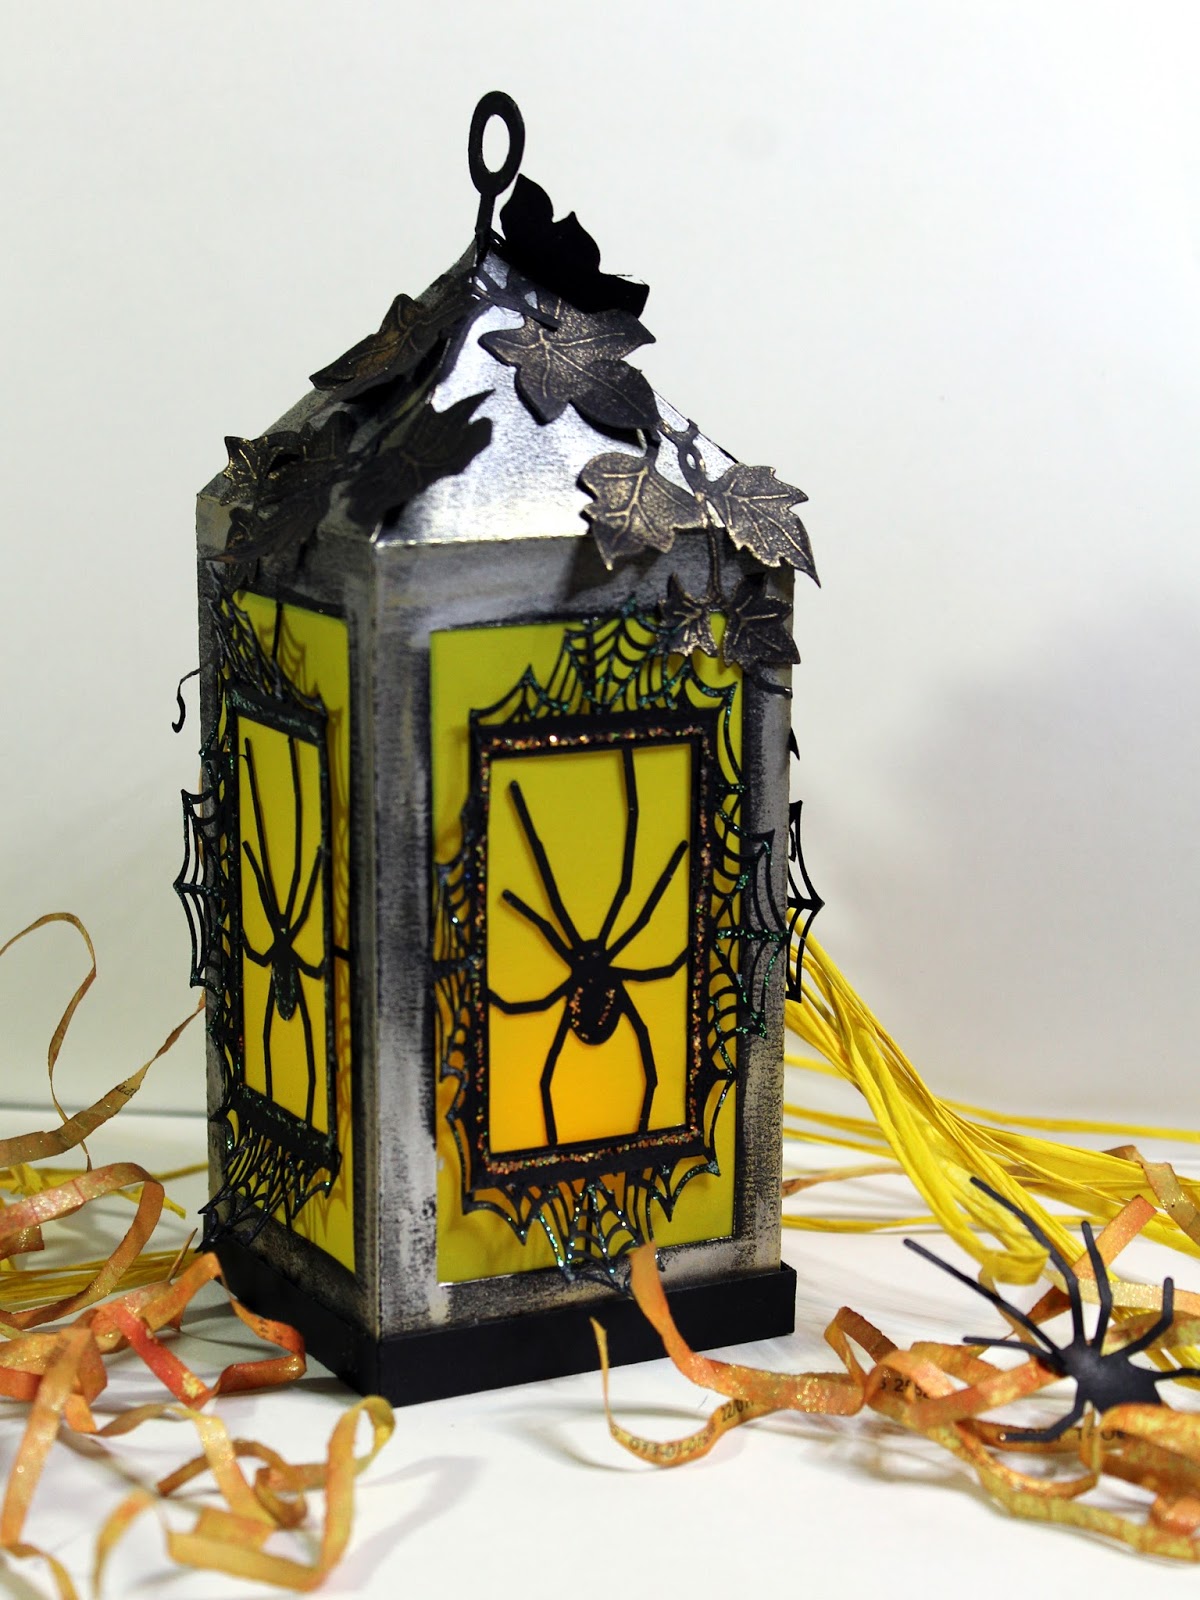
Here is a brief tutorial for my Victorian Lantern TV show sample. Anne x.

Materials:
  • Christmas USB (SVG files) from the Cutting Craftorium
  • Brother ScanNCut CM300 cutting machine
  • 12 X 12 inch card approx 220gsm: White, light blue, Kraft card
  • Battery operated T Light
  • 4 X 6mm clear glass crystals, gold plated headpins and jump rings
  • Flat nosed and round nosed pliers (for adding crystal drops)
  • Fake snow (Pinflair Snow Dust)
  • Clear embossing powder with blue glitter (Debbi Moore Print Magic)
  • Gold ultra thick embossing granules (Debbi Moore Metal Magic)
  • Versamark Inkpad and embossing pen
  • Brown pencil
  • Glitter glue (aqua and crystal clear)
  • Gold gilding wax (Pebeo)
  • Acrylic glue (Cosmic Shimmer), 3D glue gel (Pinflair) and red liner tape (strong double sided)
How to make it:
It is a bit tricky to write an exact step by step but hopefully I have given enough info for you to make something similar and adapt it to your own taste x.

Generally my settings for around 220 gsm card is: Speed 5, cut pressure 0 or 1, blade depth 5 or 6. It will vary with card thickness and structure (density etc.). If you are a newbie, or trying out a new batch of card, use the test cut function to try out settings – then record for future reference.

Note: I have edited and resized various files to create this project. Remember to save the files as you go so that you can use them again. I reload designs as I go to judge and resize subsequent pieces.


Load the star cake stand, group together, turn 45 degrees and enlarge all elements together to fit the 12 X 12 inch mat. Cut twice from blue card. Glue 2 layers together for added strength and leave dry. Note: I am using this upside down for my lantern stand.

Add Versamark ink to the stars and around the circular base, and heat emoss with thick gold embossing crystals. These give a nice vintage look. Slot together using a little acrylic glue to hold. Rub over some gilding wax. Note: keep the cut out star waste – great to use on another project.


Load the Victorian Lantern, enlarge slightly, and cut 1 base and 8 sides from Kraft card. Trim the tab sections off 4 sides and glue to tabbed sections (for added strength), leave to dry. Apply Versamark ink and heat emboss with the clear glitter embossing powder. Drop on some of the gold embossing crystal and melt. Glue together and finish with some blue glitter glue and gilding wax.

Load the Victorian Lantern Ornate Detail and resize to fit the lantern window. Cut X8 from Kraft card. Glue 2 layers together and dry (4 finished pieces). Heat emboss with the gold crystals adding more layers for a smooth covered metallic finish. Glue to lantern.

I used elements from the Matchbox Dioramma (Woodland Reindeer Scene) to decorate the Lantern windows: Load the reindeer (Layer 4) and resize to fit lantern window. Cut X 4 from Kraft Card. Trim the antlers away from 2, glue 2 layers together (for added strength). Add a little shading with brown pencil and clear glitter glue for sparkle.

Load the grass border (Layer 5) and resize to wrap around the T Light. Add 4 more and resize to fit inside the lantern windows. Used double sided tape to cover the candle. Glue grass borders inside lantern windows. Glue the reindeer in place.

Load the trees (Layer 2) and resize to fit inside the lantern windows. Cut X 4 then trim with scissors and glue inside the windows.

Next add the little crystal drops to the ornate elements using headpins and jump rings. I trimmed the front one and pierced a hole to attach the crystal so that it hung above the reindeer. Note: if you prefer just use some thread and tie on your crystal drops. Flat backed gems would also look nice.

Cut some small tabs in waste blue card and use them to make small right angle brackets to glue the lantern to the base (these will be fairly well hidden under the lantern base).

Cut several sets of the Poinsettia in white card, Poinsettia Foliage (Poinsettia folder) in blue and Kraft card. Shape the elements lightly, layer up and decorate the lantern. Glue fake snow to the poinsettia centres.

Cut several sets of Holly Leaf and Berries from the Cracker Toppers (Crackers folder) in blue and Kraft card. Shape and use to decorate lantern as desired.

Finally finish with plenty of fake snow and glitter glue.

Wednesday 5 October 2016

Fragile Seahorse card created for Chocolate Baroque Colour Challenge 27

Good morning. I am loving the sea themed colours for this month’s Chocolate Baroque Challenge. I hope that you like my Fragile Seahorse x.


Materials:
  • Underwater and Mail Art Minis stamp sets
  • 12 X 21cm white card blank, 11 X 20cm watercolour card
  • Ink spritzers (pale blue, mid blue with mica, opaque white)
  • Versamark Inkpad
  • WOW embossing powder (Blueberry)
  • Sea themed or textured stencil (I used Fossil from Andy Skinner)
  • Alcohol marker (dark blue) and fine tipped marker (opaque white)
  • Glitter pen (mid blue)
How it was done:
  1. The card was spritzed with water and the blue inks (I used Mr Huey’s and Lindy’s Stamp Gang spritzers). The stencil was immediately laid on top and the card left to dry naturally. The inks get ‘pulled’ under the stencil surface by capillary action (so you get a negative image).
  2. The card was then spritzed with white ink, the seahorse and sentiment stamped and embossed with blue powder, coloured with glitter and white pens.
  3. The panel and card were then edged with the blue marker to frame the image.

Sunday 2 October 2016

Style Boutique home decor sample created for Bother ScanNCut

Good morning – I am so excited to have been chosen to join the Brother ScanNCut Design Team. I still cannot believe it. I am so looking forward to creating and sharing my new creative journey with you all.
This is one of my first projects using the lovely set of images and cutting files from the Cutting Craftorium Style Boutique Collection (CD images and SVG files on a USB) recently launched from Tattered Lace on Create & Craft TV.

I printed images from the CD and used the ScanNCut to cut out decoupage elements for layering. I hope that you like my mini canvas. I particularly like the sentiment – describes my craft room perfectly! Tee hee.

Anne x

A bit about the Style Boutique Collection:

The CD is packed with wonderful background papers, scenes, ready made toppers, and all the separate images for dressing up some lovely ‘dolls’. Think paper dress up dolls (I used to love playing with those in the 60’s and 70’s). Images include lovely ladies with a range of gorgeous dresses, hair styles, hats, shoes and handbags etc. There is also a young boy and girl doll. There are also templates for A 3D wardrobe and dressing table. Fabulous CD with images designed by Nikki Hall from Polkadoodles.

My Craft Studio Elite software is also included on the CD which enables you to build scenes, resize, recolour etc. This is a great stand alone CD. You can dress the dolls digitally and create projects for printing. Alternatively you could print a sheet of elements to cut out by hand for decoupage or dressing the printed dolls. No need to have a cutting machine.

The USB contains SVG files to cut out the dolls and all the elements which can be directly read by the ScanNCut machine – just insert the USB. SVG files can also be used with many other cutting machines including the Silhouette (with Silhouette Studio Designer Edition software). I also have a Silhouette Cameo and had no problem importing the files into my software. Again this could be used as a stand alone set of images for drawing or cutting – e.g. used pretty patterned papers to cut out the dresses etc. There is also a free SVG download available for drawing the faces on the dolls if you are not confident with drawing them yourself.

Note about My Craft Studio Elite:

I am a complete newbie to My Craft Studio (MCS) software. I generally use Serif Craft Artist for all my digital crafting, importing images and creating digikits as I need. However, as this CD is designed to use alongside that MCS software I simply had to get to grips with it – especially as I wanted to provide project instructions for you all.

Due to the tight deadline for TV show samples I only had one evening to get to grips with the basics! If you have never used it before, don’t be scared. The software really is easy to use and has lots of versatility for advancing and growing with it’s capabilities.

Materials:
Style Boutique CD (image files) and Cutting Craftorium Style Boutique Brother ScanNCut USB (SVG files)
My Craft Studio Elite software (included on the CD)
Photo frame (aperture approx. 11.7 X 16.7cm, to fit 12.7 X 17.7cm mat)
Fine tipped pink glitter pen
Super smooth paper for colour printing (approx. 120gsm)
Card for backing and scrap black card
Standard A4 Colour printer
Brother ScanNCut machine

Summary of how it was done:
Using MCS I loaded a new A4 page and dropped on the Hessian (47) background image. I reduced the opacity to make it paler.

I then dropped on the ready made scene from Lil May’s Wardrobe, centred it and resized it to approx. 15cm high (to fit my frame). I then added a rectangle vignette in pink around the image (to give the effect of inking the edges). Printed the image as shown in the pic below.


I trimmed the printed image and glued to backing card to fit my frame (12.7 X 17.7cm). Note: there is capability of adding shadows in the software and I would add these if I made another. This would give more depth and 3D effect to the image.

Next I added another blank page to my project. I then added individual images from Lily May’s Wardrobe – dropping them onto the scene and resizing them to fit over the elements in the scene. (dresses, shoes, bows, skirt, cat and, T-shirt). Once resized I copied and pasted them to the blank page so that they could be printed out for decoupage.

I copied the dress images (i.e. 2 copies of each for printing). I also added the chair and an extra cat, flipped (tip: right click and select flip – took me ages to work that one out – tee hee) and resized so that they could be used to glue onto the outer frame. I changed the colour of the chair to fit my colour scheme better (green). Finally I added some hearts and flowers in various sizes. See pic below.

As the sentiment was quite small on my project I cropped it from the main image and enlarged it for printing. I trimmed it out and layered onto white card and drew a faux stitched border with pink glitter pen. I glued to the frame (covering the smaller printed sentiment) using 3D glue gel (see pic above).
The cut elements were shaped and glued to the image and frame with 3D glue gel – et voila!