Monday 27 March 2017

Easter Egg Card created for Chocolate Baroque

Good morning. The recent shows on Hochanda featuring the Russian themed stamps and stencils from Chocolate Baroque were simply brill – great demos and such a lovely range of samples from my Teamies. If you missed the shows they do remain available online (23/24th March) for a while so you can catch up on the FAB demos from Lesley Wharton.
 
I am sharing one of my show samples today created with the lovely Russian Floral egg, Katya and crackle stamps. These stamps are exclusive to Hochanda until the end of the month. After that they will be available directly from Chocolate Baroque.


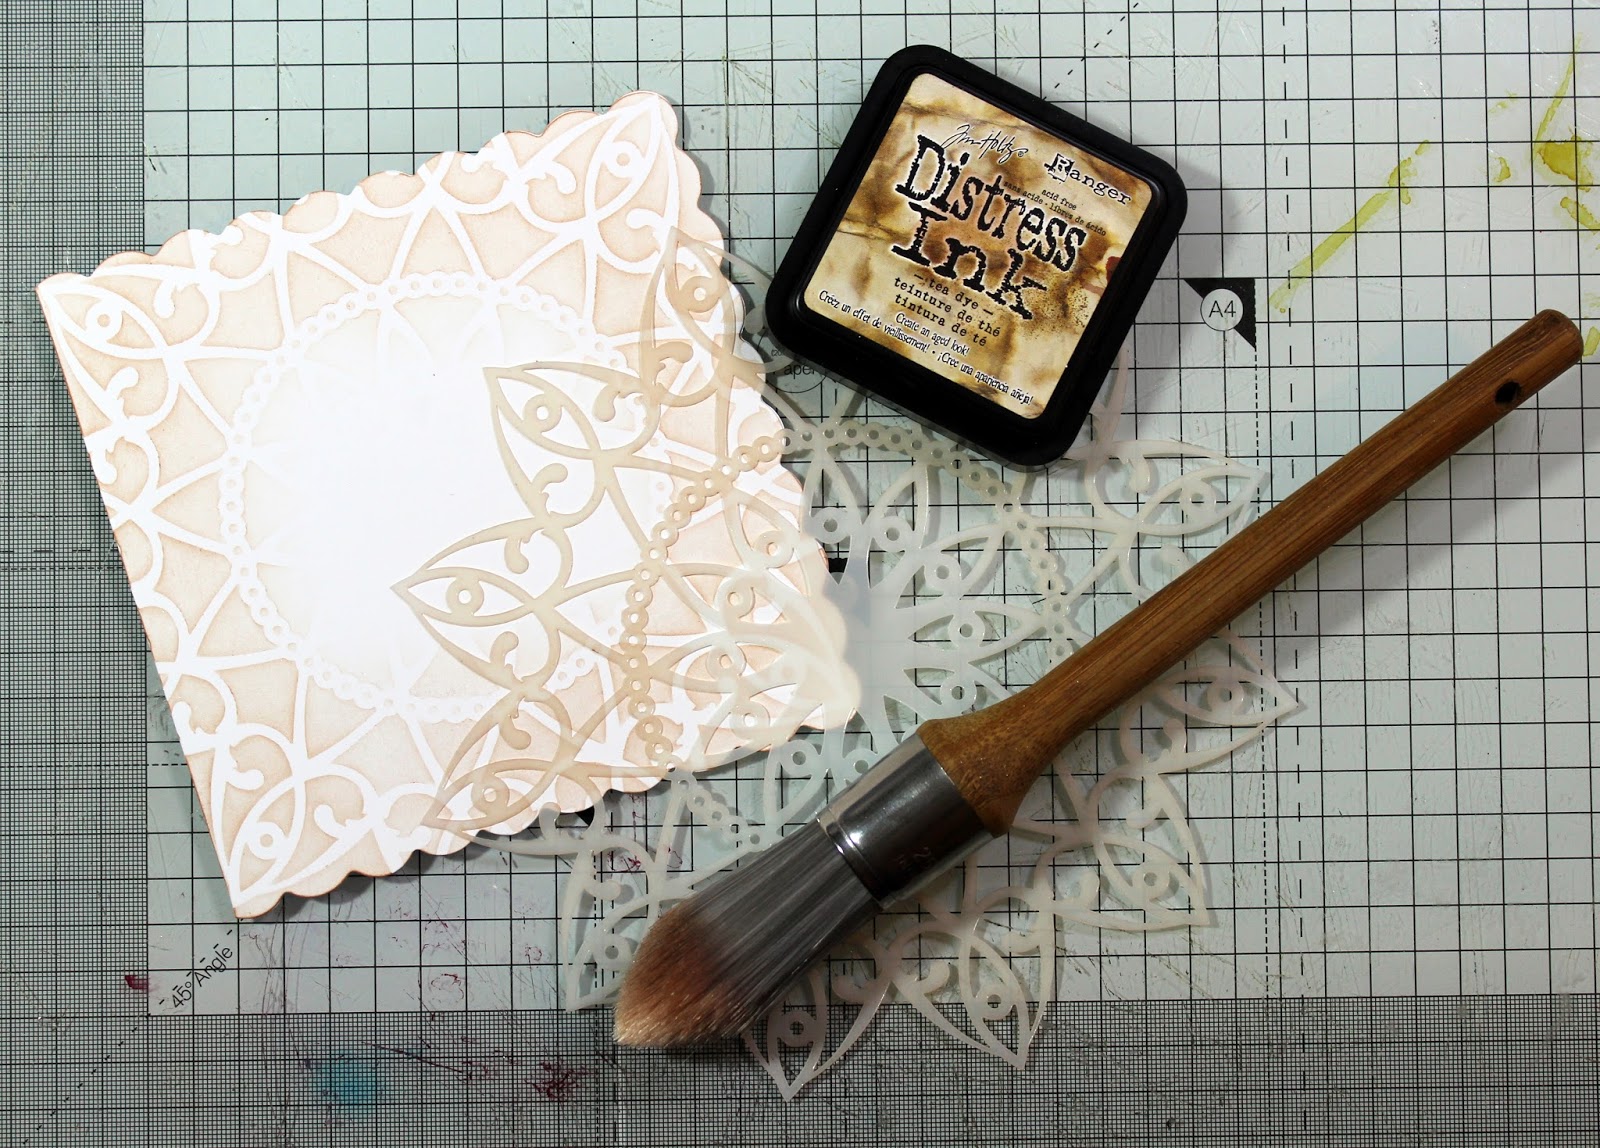
I used the decorative headdress from the beautiful Katya stamp to create a shaped card on which to mount the egg.
 
Materials:
 
How to make it:
  1. Stamp the Katya headdress twice onto black card with Versamark and heat emboss with the powder. Colour the images with gold sparkle pen and blue pencil. Cut out to make a shaped topper, making the top and bottom edges parallel, horizontal and straight. Edge with gilding wax. Mount onto lemon card and cut out to leave a fine border.
  2. Glue the topper to the card blank aligning the top horizontal edge with the fold on the card blank. Trim away the card blank (omitting the top edge) to make the shaped card. Add Glossy Accents to emphasise some of the patterned areas and glue on sequins.
  3. Using the crackle stamp add texture to the Kraft card by stamping with Distress Ink and gold acrylic. Stamp the egg with Versafine and cut out. Colour with gold sparkle pen and blue pencil. Mount onto black card and cut out to give a fine border. Edge with gilding wax. Apply Glossy Accents over the floral, swirl and leaf elements. Mount onto the card front with 3D foam and finish with a bow.

Sunday 26 March 2017

Easter Treat Box created for Chocolate Baroque


Good afternoon. The recent shows on Hochanda featuring the Russian themed stamps and stencils from Chocolate Baroque were simply brill – great demos and such a lovely range of samples from my Teamies. If you missed the shows they do remain available online for a while so you can catch up on the FAB demos from Lesley Wharton.

I am sharing one of my show samples today created with the lovely Russian Floral egg and crackle stamps. These stamps are exclusive to Hochanda until the end of the month. After that they will be available directly from Chocolate Baroque.

Hope that you like my Easter treat box – ideal for filling with chocolates.
 
Materials:
  • Russian Floral Egg and Large Crackle Background (sold out individually on Hochanda)
  • 15 cm square egg stencil (Claritystamp)
  • 21cm square white card (box base) and blue card (box lid), gold mirror card (for decoration) and 15cm square grey board
  • Stazon Inkpad (Black)
  • Soft Form Relief Paste (Gold)
  • Pebeo Modelling Paste
  • Gesso (black), Pebeo acrylic paint (Iridescent Gold) and Martha Stewart satin acrylic (Indigo)
  • Pebeo Gilding Wax (Empire Gold)
  • Boxer Board (Crafters Companion)
  • Glossy Accents and PVA pearls (gold)
  • Satin ribbon (blue)
  • Happy Easter die (Heartfelt Creations Flowering Dogwood Collection)
How to make it:
  1. To make the box using the boxer board, score around each side of the square at a depth of 3cm, choosing the box base and box lid score lines on the board. I used a 21cm square of white card for the base and blue card for the top. Using the score board makes it really easy. The score line measurements are slightly offset on the base side of the board so that it automatically makes a base slightly smaller than the top so that they fit together. Snip into the corners to create the gluing tabs. Before constructing the lid stamp the sides with the crackle stamp and gold paint.
  2. Coat the egg stamp with a layer of Soft Form Relief Paste and leave to fully dry. This can take 2 days depending on room temperature and humidity conditions. Gentle peel away from the stamp and trim off any rough edges. Paint over the whole surface with blue acrylic paint. Quickly wipe across the surface with a damp cloth to remove paint from the upper surface level, leaving the blue colour in the deeper level. When dry, mount onto blue and gold card and glue to the box top with 3D foam for depth. I also added Glossy Accents into the blue leafy swirls for added shine, and added some PVA pearls.
  3. Die cut the sentiment in both blue and gold card. Layer together slightly offset to create depth. Glue to the box top. Coat with Glossy Accents for added shine.
  4. Stamp the egg 5 times onto gold mirror card with Stazon (only need the central area with the flower and leafy swirls). Cut out and shape the flowers slightly. Glue to the box sides and onto the paste egg topper. Add small PVA dots to flower centres. Initially I wanted to make these embellishments with the Relief Paste but I ran out of time rushing to get this ready to post for the shows. I don’t have central heating so the paste takes 2 days for each layer to dry!
  5. To make the box topper coat the grey board with gesso to seal. When dry apply modelling paste through the stencil with a palette knife. Leave it to dry for around 10-15 minutes and press the crackle stamp into the paste to create texture. Leave to fully dry and apply another coat of Gesso. Stamp the crackle over the surface using gold paint. Rub over the surface and edges with gilding wax. Glue to the box top.
  6. Finish with a large ribbon bow.

Vintage Birdie Spring Card created for Chocolate Baroque


WOW, the shows with the Babushka and Russian stamps this week were simply FAB. So many lovely samples from my Teamies and great demos from Lesley.

This morning I am sharing a Spring themed card with you – a Vintage styled project using the Spring Bird Crocus set. I hope that you like it x
 
Materials:
  • Spring Birds Crocus and Breath of Spring stamp sets
  • 8 X 8 inch card blank, 6 X 6 inch background paper from Crafty Individuals (Shades of Summer), white stamping card, green card and pink glitter card
  • Inkpads: Versafine (Vintage Sepia), Versamark, Distress Ink (Broken China, Tattered Rose)
  • Heat embossing powders (clear and gold sparkle)
  • Watercolour, sparkle and glitter pens (yellows, blues, pinks, greens)
  • Alcohol marker (pale blue-grey) and metallic marker (gold)
  • Glitter glue (gold)
  • Trellis die (to cut glitter card border – a paper doily would also work well)
  • Metallic thread (gold) and acrylic gems (gold)
How it was done:
  1. The bird scene, sentiment and border were stamped onto the patterned paper with Versafine and embossed with clear powder. Water based pens were used to colour. To bring out the scene a little more from the background I used a grey marker to add a drop shadow.
  2. The scene was stamped a second time onto white card, coloured and cut out for decoupage.
  3. Broken China Distress Ink was blended in from around the edges. The topper edges were then embossed with a little gold sparkle powder. Decoupage elements were glued down with 3D glue gel.
  4. The topper was matted onto green card. I used an offcut from a Trellis die cut (pink glitter card) to layer behind the topper left hand side. Gold thread was added for extra sparkle and texture. A square paper doily tinted with Distress Ink would also work really well if you don’t have dies.
  5. The background card blank was stamped using Tattered Rose Distress Ink. Broken China Ink was used to blend in from the edges, and the gold pen used to edge the card.
  6. I finished with gold glitter glue and gems (I cannot resist a bit of bling).

Saturday 25 March 2017

Easter Bunting created for Chocolate Baroque


Good evening. The recent shows on Hochanda featuring the Russian themed stamps and stencils from Chocolate Baroque were simply brill – great demos and such a lovely range of samples from my Teamies. If you missed the shows they do remain available online for a while so you can catch up on the FAB demos from Lesley Wharton.

I am sharing one of my show samples today created with the lovely Russian Floral egg. These stamps are exclusive to Hochanda until the end of the month. After that they will be available directly from Chocolate Baroque.

This stamp would also make lovely bunting for a summer garden party or wedding, stamped onto flag or triangular card or fabric joined with ribbon.
 
Materials:
  • Russian Floral Egg (sold out individually on Hochanda) and Spring Bird Daffodil stamp sets
  • Coloured pastel card (blues, pinks, purples, lemon)
  • Detail heat embossing powder (opaque white)
  • Sparkle pens (clear and gold)
  • Versamark Inkpad
  • Pinflair Craft Glaze
  • Alphabet dies (Create & Craft Couture)
  • Mini wooden pegs
  • Florists ribbon (white) and embroidery thread (variegated sparkly metallic)
 
How to make it:
  1. Stamp the eggs 6 times with Versamark onto coloured card and heat emboss with white powder. Colour with clear sparkle pen and cut out. Paint over some areas with clear glaze (darkens the background colour and enhances the glitter effect).
  2. Die cut the letters and coat with glaze. Glue to the wooden pegs. Glue the pegs to the easter eggs catching in the thread for hanging.
  3. Stamp and emboss the large daffodil bunch onto lemon card 10 times. You only need the area with the large flower head. Colour with gold sparkle pen blending out the colour with water. Cut out the daffodil head. Glue the daffodils back to back along the thread between the eggs. Note: the daffodils do tend to flip along the strand which is why I backed them with another flower head.
  4. Finish by tying on small strips of florist ribbon (curl with the edge of your scissors).

Wednesday 22 March 2017

A Little Bird Told Me card created for Chocolate Baroque


Good morning. Here is my contribution for this month’s Colour Challenge. I have used some of those ‘little extra elements’ that often come along with the main images in a stamp set. These are so often overlooked but they are perfect for creating backgrounds, building patterns or for decorating die cuts.

The small decorative stamp from the Spring Bird Daffodil set was stamped onto each of the die cut flower petals. The small flower centres were stamped with one of the blossoms from the bird branch. I added a bit of Flower Soft and stamens for added texture.

I stamped and cut out the cage and bird from A Little Bird Told Me stamp set. The background and elaborate birdy tail were created using the Baroque leaf swirl from the Breath of Spring stamp set.

I used a Baroque label die to layer up in the background as I thought it co-ordinated perfectly with the Baroque leaf swirl stamp. Decorative ovals would also work well for this layout.

Materials:
How it was made:
  1. The card blank was randomly stamped with the Baroque swirl leaf from the Breath of Spring stamp set using Distress Ink. Ink was also blended around the card edges to frame.
  2. The thin ‘beaded’ strips were actually waste pieces from a card blank die cut in white (Double Cascade Waterfall). I coloured them with the burgundy alcohol pen and glued to the card to divide up the background. The leaves in the upper and lower sections were then coloured with lavender alcohol pen. The sentiment was stamped with Versamark and embossed with honey powder.
  3. The Victorian Baroque Label die set has separate inner and outer dies enabling the decorative elements, background mats and frames to be cut out. Two background mats were cut in lavender card. The other layers were all cut in white card. I spritzed the background mats with lime and gold shimmer inks. The burgundy layers were coloured using an alcohol pen. These were then layered up and glued to the background. I used 3D foam for the central label to give added dimension.
  4. The cage and bird were stamped with Versamark and embossed with gold powder. The Baroque leaf swirl was stamped several times and embossed with honey embossing powder. These were cut out and coloured with watercolour pens. The elements were lightly shaped and glued to the card with 3D glue gel for dimension. The large tail swirls of the bird were snipped off and replaced amongst the Baroque swirl elements to build the new elaborate bird tail.
  5. The small decorative stamp from the Spring Bird Daffodil set and Distress Ink was used to stamp over the petals of the die cut flowers (2 large and 3 medium flowers). Die cut mini flowers were stamped with one of the small blossoms from the bird branch (Spring Bird Daffodil set). This was achieved placing the stamp flat onto the work surface, partially inking the stamp (i.e. picking one of the blossoms) and pressing the die cut onto the stamp (i.e. Sheena Douglass style) to transfer the ink. A little colour was added using alcohol ink pens (to keep the integrity of the stamping detail – watercolour would cause the Distress Ink to spread). The edges were lightly inked with Distress Ink. The flowers were shaped using a ball tool and foam mat. Flower Soft and stamens were added to the centres to give added texture.
  6. Finally finished with PVA pearls and glitter glue for sparkle.

Tuesday 21 March 2017

Quick & easy mandala cards created for Chocolate Baroque


Good morning. Today I am sharing a set of quick and easy cards. These are great for batch making and keeping in your stash for those emergency cards. I have used various Flowerhead and mandala stamps onto plain white and coloured card. These were then cut out and layered onto a 6 X 6 inch scalloped card blank which had been quickly inked through a stencil.


The backgrounds took less than 30 seconds to create – simply brushing Distress Ink through a stencil. I used one of the lovely brushes from Claritystamp. The middle doesn’t need to be coloured as it is covered by the next layer.

Materials:

Blue Bird quick and easy card created for Chocolate Baroque


Good morning. Today I am sharing another quick make using the Spring Bird Crocus and Breath of Spring stamp sets from Chocolate Baroque. I love creating these monochrome scenes. Chipped Sapphire Distress Ink is the perfect colour, giving the effect of blue & white pottery.

I used fancy edged circle dies to cut the stamping plate and background, but plain circles would work well too. I stamped the image with Distress ink and dragged out the colour using a damp brush. Extra colour was added by picking up more ink from a craft mat and a watercolour brush. The corners were stamped directly onto the card front. I added a coat of Spray & Shine to the topper to give it a ‘pottery tile’ finish.

Materials:

Wednesday 15 March 2017

Rose card created for Chocolate Baroque Colour Challenge 33


Good morning. Here is my first contribution for the Chocolate Baroque Colour Challenge No. 33.
 
The images were stamped with Versamark and embossed with gold powder. The edges were distressed (using the edge of scissors) and coloured with watercolour ink (picking up colour from my craft mat and applying with a sponge).
The images were quickly coloured with watercolour pens and a damp brush (the embossing powder resists so colouring is really quick and easy).
 
Materials:

Tuesday 14 March 2017

Upcycled and dyed polyester blouse

Good morning. I am sharing an upcycled blouse which I dyed with old iron fix silk paints that were past their best. I got the blouse in a charity shop for just £2. I loved the style but I really am not a ‘cream blouse girl’. The blouse was 100% polyester which is generally difficult to colour – you really need to use specialist dyes for polyester or iron transfer paints (which you paint onto paper then iron to transfer the colour). However, I have found that iron fix fabric paints will stain polyester permanently. They are best watered down – otherwise most can leave a stiff finish on the fabric, especially sheer fabrics such as this blouse.

Sorting through my stash I found some very old silk paints (fluid formula) which were really past their best and they had some precipitation. They were no longer suitable for fine silk painting work. However, they are perfect for this sort of job. I find it best to pick up colour with a very damp sponge and simply dab it over the fabric allowing it to blend. Thicker iron fix paints, and even standard acrylic paints, also work well provided they are diluted out. Results are not predictable but that is the joy of this sort of project.

When finished I allowed the blouse to dry overnight. I also put it through a tumble dryer cycled (hot iron not suitable for this fabric). I then machine washed (virtually no colour came out in the wash).

Delighted with my new blouse.


Daffodil Fold Back Card created for Chocolate Baroque


Good morning. Here is another of my blue & white monochrome show samples using the Spring Bird Daffodil and Breath of Spring stamp sets. Cannot stop making these – they are just so effective.

Materials:
How to make it:
  1. Open out the card blank and randomly stamp the inside with the leafy swirl. Edge with Distress ink to frame.
  2. Score the front of the card vertically in half and fold back the front. Glue down ribbon.
  3. Cut two squares. Stamp one with the sentiment and decorative corners. Edge with Distress Ink and glue to the card inside.
  4. Stamp the second square with the Daffodil and sentiment. Using a damp brush drag out some of the colour. Add more colour by picking up ink from your craft mat using a watercolour brush. Paint in extra shadows – use the stamp detail as a guide. Glue to the card front overhanging the folded back edge.

Wednesday 8 March 2017

Baroque Meadow card and tag created for Chocolate Baroque Colour Challenge 32


Good morning. Here is another of my projects for the Chocolate Baroque Colour Challenge. I have used the shaving foam technique to create the swirly background for this card and tag set. I stamped the card blank with Distress Ink to create the outer background frame. The main images were stamped using Versamark and heat embossed with copper powder.

Materials:
  • Baroque Meadow, Silhouette Grasses, Words to Dazzle & Sparkle stamp sets
  • 17.5cm square card blank, pale blue and holographic copper card for layering, white stamping card, and gift tag
  • Inkpads: Distress Ink (Tumbled Glass) and Versamark
  • WOW heat embossing powder (Copper)
  • Tray to fit paper, shaving foam, and water based liquid inks (greens and copper with mica)
  • Fine tipped pen (pale blue)
  • Piercing tool (pricking tool/bradawl), foam mat and ruler
  • Organza ribbon and PVA pearls (pale blue)

How to make it:
  1. Squirt a layer of shaving foam into a tray. Drop inks onto the surface and swirl over the surface with a cocktail stick. Lay card on top pressing down lightly to transfer ink. Lift off and use the edge of a ruler to lightly scrape across the card and lift away excess foam layer. Tip: Have lots of paper, card and tags etc. ready and do a whole batch at once. You will then have plenty of backgrounds in stock for future projects. Keep dropping on more inks and swirling etc. Eventually the colours will blend into the foam, and the colours will mix and become muddy. Just keep going for as long as you like the results. Muddy brown papers can be nice for cutting out branches or even Steampunk cogs etc. using dies. Another note about this technique: The papers dry smooth and with a slight sheen that is resistant to water so they are best used with stickier or solvent based inks for over stamping.
  2. Stamp the card blank with the Silhouette grasses and Distress Ink. Pierce a border using a pricking tool with foam mat beneath. Add faux stitching with the fine tipped pen.
  3. Cut the mats and layers for the tag and card front. Stamp the tag and topper with Versamark Ink and heat emboss with copper powder.
  4. Glue layers together and add ribbons. Finish with PVA pearls.

Tuesday 7 March 2017

Tiered Maxi Skirt made from a recycled bed sheet


Good afternoon. I am sharing a skirt that I made from an old double bed white sheet. I dyed the background and made up this simple tiered skirt. I simply measured my hips and cut the width of the top tier so that I could pull it on easily with an elasticated top band. I then added tiers of increasing width (approx. 1.5 to 2X the width of the previous tier). I used a remnant of embroidered fabric for the bottom frill.

Before adding the elastic to the waist I machine embroidered rows of decorative stitching and flourishes. I then block printed with various designs and heat set to make permanent. Summer here we come.

Materials:

White cotton double bed sheet, cotton ribbon for trim (dyed with sheet) and remnant of turquoise embroidered chiffon

Dylon multipurpose dye. This is now discontinued but they have a new formulation that is equivalent for use on natural fabrics (dyed in washing machine).

Madiera Rayon embroidery thread – variegated golds and browns

Wooden printing blocks:

Owl (Blockwallah), small leaves, floral sprig, daisy flower, leafy spiral (Colouricious), paisley and floral Border (unknown brand)

High density foam mat - to lay underneath as block print (Colouricious)

Fabric paints - heat set with iron (to make permanent):

White Gold Starlights Fabric Paint (Imagination Crafts), Chestnut Brown Multipurpose Satin Paint (Martha Stewart), Turquoise blue mixed to match fabric – Opaque White (Jacquard), Metallic Turquoise and Blue (Vallejo from Colouricious)

Friday 3 March 2017

Butterfly Stepper Card created for Chocolate Baroque


Good morning. Today I am sharing another of my show samples using the Breath of Spring stamp set from Chocolate Baroque. The butterfly swirl can be used to make lovely backgrounds but it also works well as the main decorative feature. I used sparkly black embossing powder for added dimension (a bit difficult to see in the pic). I stamped and cut out extra butterflies and used them to embellish this stepper card, along with some die cut swirls and paper punched flowers. I also used a pretty background paper from Crafty Individuals (6 X 6 inch pad – Springtime). Victorian Velvet Distress Ink was used on the card blank and edges.
I cannot wait for more shows coming at the end of the month. Lesley will be bringing us something a little different. My lips are sealed – tee hee x.

Materials: